
Make some floor space and enjoy this routine at home
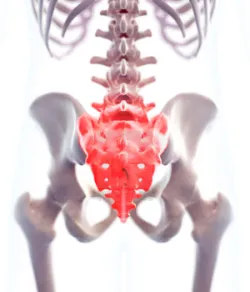
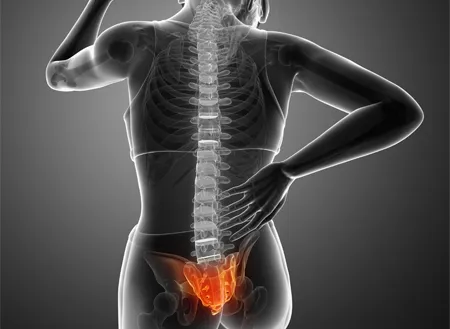
During pregnancy, it’s important to keep your body strong, stable and flexible. As your body changes with the growth of your bundle of joy, surges of the hormone relaxin help the pelvic ligaments to stretch and make room for pregnancy and birth. This creates increased movement of the pelvic joints which can cause pains around the buttocks and pubic bones for some women. The weight of your developing baby pulls the lower back into a greater arch causing the muscles there to overwork and feel light and tired. As a compensation for your changing lower trunk postures, the upper back, chest and shoulders tend to stiffen.
But the good news is that some pregnancy specific exercises, when done 3-5 times per week, can help to counteract all this, reducing pain, stiffness, and improving stability. So I’ve put together a short home exercise program for mums to be to practice at home, 15 minutes at a time, 3-5 times per week, to help protect you throughout your pregnancy and prepare you for the birth and recovery process.
Important things to consider while exercising in pregnancy
-
Take exercise at a gentler pace; don’t push yourself to achieve new personal bests while pregnant.
-
Check with your doctor whether they are happy for you to exercise in your pregnancy.
-
Taking care of your pelvic floor muscles should be a priority. These muscles are under a lot of load as your baby grows, so learn how to correctly contract and relax them, and avoid high impact exercise and heavy lifting to avoid extra strain on them. To get the pelvis floor muscles to relax, think of a pebble dropping into a pond and sending ripples out in rings along the surface of the water. This is the pelvic floor relaxing, dropping and widening (great for labour when pushing out your little one). To tighten and lift it, think now of the reverse, the ripples returning to centre and the pebble being lifted up out of the pond.
-
Be aware of good alignment, posture and form to protect the spine, pelvis and hips which are all undergoing major changes. Before you start an exercise ask yourself, is my pelvis in its neutral zone? Are my waists long and spine tall?
-
Take into account the fact that the hormone relaxin is making your ligaments and joints more flexible and mobile, so keep movements smooth and gentle to protect your pelvic joints.
-
When to avoid all exercise and seek immediate medical opinion: if you are having vaginal bleeding, breathlessness at rest or with little exertion, decreased frequency of the baby’s movements, high levels of pelvic and/or back pain.
So with all of this considered and checked, try out these exercises. See it as time for you. And for the health of you and your baby.
Front Hip Stretch
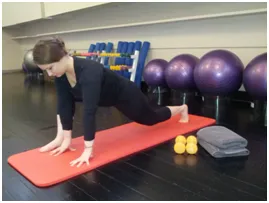
The Goal
- To stretch and release the front muscles of your hips, which tighten a lot with your tipped forward ‘pregnancy pelvis posture’.
The Exercise
- Bend the knees and pop the fingertips onto the floor between the legs
- Step the right leg a big stride out behind
- Sink the pelvis heavy towards the floor
- Hover the back knee off the floor
- Hold this position for 30 seconds and then repeat on the other side
- You should feel a stretch at the front of your hip on the back leg
Extra Tips
- Imagine a heavy weight attached to your hip on the front leg side, and imagine that weight dragging that hip down towards the floor
- Gently reach the hip of your back leg forward, and extend the heel out behind
Wall squat
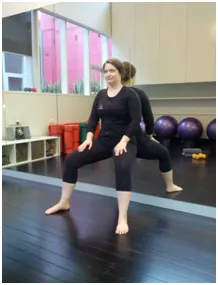
The Goal
- To strengthen your thighs, buttocks and upper arms – you will need good strength here for labour postures and when caring for your new bub.
- To stabilise the trunk, neck, knees and shoulders in an ideal alignment throughout
Getting ready
- Start with your back against the wall, with the tailbone flat against the wall, a little arch behind the lower back and flat ribs and upper back against the wall, and soft relaxed neck and shoulders
- Set up your feet wider than the hips, and keep the knees as wide as the middle of each foot
- Keep your pelvis neutral – imagine your pelvis is a big fruit bowl full of water and the water is level, not spilling out the front or back of the pelvic bowl.
- Grow tall up both sides of your waist and notice that the pelvic floor and deep tummy gently engage
The Exercise
- Inhale to prepare deep and wide
- As you exhale, become aware that the pelvic floor and tummy are already gently engaged, and slide down the wall into a squat
- Hold there and check that your knees are still wide in line with the feet, that the tailbone is still flat on the wall, the little arch behind the back has not changed, and the ribs and upper back lie flat on the wall
- Gently slide your shoulder blades down the back away from the ears, open the chest and tuck your chin a little towards the middle throat
- As you hold your squat, inhale, as your exhale engage pelvic floor, tummy
- Repeat 8x as you hold your squat. Do this 4 times.
- You should feel your thighs working hard.
Extra Tips
- As you hold your wall squat, squeeze you buttocks for a moment and feel the sit bones under your pelvis seem to travel closer together. Then let the buttocks relax, and feel the sit bones widen. Keep the butt relaxed and the sit bones wide throughout the exercise.
- Check that your tail bone stays flat on the wall and it’s tip does not curl under you, flattening the lower back arch as your thighs start to fatigue
- Keep those shoulders gently back and down, and a softness in the neck
- Keep breathing lovely deep, wide breaths
- Imagine your feet resting lightly on egg shells or marshmallows, and the thigh bones drawing back into the hip sockets
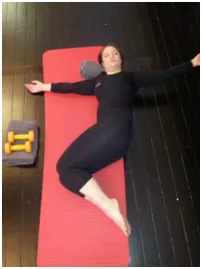
Single Leg Floats
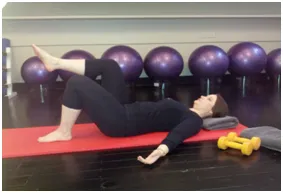
The Goal
- To use the deep stabilising postural muscles of the trunk to maintain a great spinal and pelvic alignment as you move the legs. Your deep abdominal corset really needs to work hard in pregnancy and this exercise will help you achieve strength and endurance.
Getting ready
- Lie on your back on a mat with your knees bent
- Have your feet and knees hip width and check that your tail bone rests flat and heavy on the mat (this should give you a gentle arch behind your lower back)
- Rest your hands on your ‘headlights’ (the pointy bones at the front of your pelvis) on each side to check that you are not rocking your pelvis in any direction.
The Exercise
- Take an inhale deep and wide to prepare
- As you exhale, lift the pelvic floor, draw the headlights together and float one leg up stopping with the knee over the hip, bent to 90 degrees
- Stay for an inhale deep and wide and relaxed
- As you exhale, lift the pelvic floor, draw the headlights together and lower the leg back down for a light controlled landing.
- Repeat 4x each leg, alternating sides each time, for a total of 8 reps
- You should feel the pelvic floor and the lower abdomen gently engaging to help control your posture
Extra Tip
- Use the pelvic floor and deep tummy to keep your tailbone flat, the back arch the same shape, and prevent any rocking of the headlights side to side.
- Imagine you have marshmallows or eggs shells underneath the soles of your feet again and you are not allowed to squash them throughout the exercise. Think light feet!
Toe Tapper in side lying

The Goal
- To strengthen your buttock muscles that stabilise the hips and pelvis whilst maintaining ideal trunk posture. Keep those strong pert buttocks!
Getting ready
- Lie on your side
- Have your knees bent, feet back in line with your bottom, neck supported by a pillow or towel
- Stack your hips one right over the other
- Find your neutral lower back arch, tuck your ribs in at the front, and stack your shoulders one right over the other
- Lift your lower waist a little off the mat to straighten out your spine
The Exercise
- Take an inhale to prepare, deep and wide
- As you exhale, acknowledge that the pelvic floor and deep tummy muscles are already gently engaged as you maintain a neutral spine and pelvis
- As you inhale lift the top leg, heel first in line with the body
- As you exhale engage the pelvic floor, deep tummy and lower the leg toe first to tap, tap, tap on the floor
- Repeat 2 sets of 8, one each leg
- You should feel you buttock working on the top leg side
Extra Tip
- As you lift the leg, imagine the thigh bone being sucked up into the hip socket
- Imagine your leg is a heavy, floppy, dead weight being dragged through thick honey
- Keep the top hip forward and the foot back
- Keep the knee and toe always facing the floor
- Don’t let the back arch change shape or the pelvis rock and roll
Pidgeon Stretch
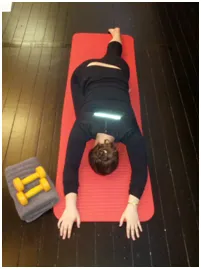
The Goal
- To stretch and release your buttock muscles. A favourite of our pregnancy ladies.
Getting Ready
- Set yourself up on all fours
- Bend your right knee up in front of the body so that the knee is roughly mid-line and the foot rests under the left hip
- Extend your left leg long and straight out behind you
The Exercise
- Sink your hips down towards the floor
- Rest your forehead on your forearms if that feels comfortable, or stay up with weight on your hands if that feels better
- Hold for 30 seconds and then repeat on the other side
- You should feel a stretch in the right buttock
Extra Tips
- Reach your left hip down towards the floor gently
- Imagine your right hip growing long away from your waist and ribs towards the foot end of your at
Bow and Arrow Stretch
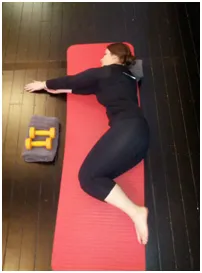
The Goal
- To stretch the muscles about your upper back, chest, ribcage and shoulders and encourage free movement of the spine and ribcage into rotation. Another favourite – really get into the zone and enjoy this!
Getting Ready
- Lie on your right side with your neck supported by a pillow or rolled up towel and your knees bent
- Stack your hips one directly over the other and bring your hands together out in front of your shoulders resting on the floor
The Exercise
- Reach your left hand forward along the floor feeling that the arm stays relaxed and the movement comes from the upper back rotating
- Draw your left arm back along your right and across your chest and out behind you to make a T shape
- Fold the hand back to the chest and reach forward again to repeat
- 10 x each way, and repeat on the other side
- You should feel stretching around the upper back, shoulder, chest and ribs
Extra Tips
- Imagine you are an archer drawing a big bow and arrow
- Turn the upper body but keep the pelvis still
- Turn your thumb to face the floor
Enjoy! If you’re struggling with pains around your pelvis despite your exercises, please let one of our staff know. We can help with hands on physiotherapy treatments, women’s health physiotherapy consults, and can fit you with pregnancy pelvic belts or compression shorts if they’re needed for a bit of extra support.