Tabitha Articles

Pregnancy and rib pain

Pregnancy and rib pain

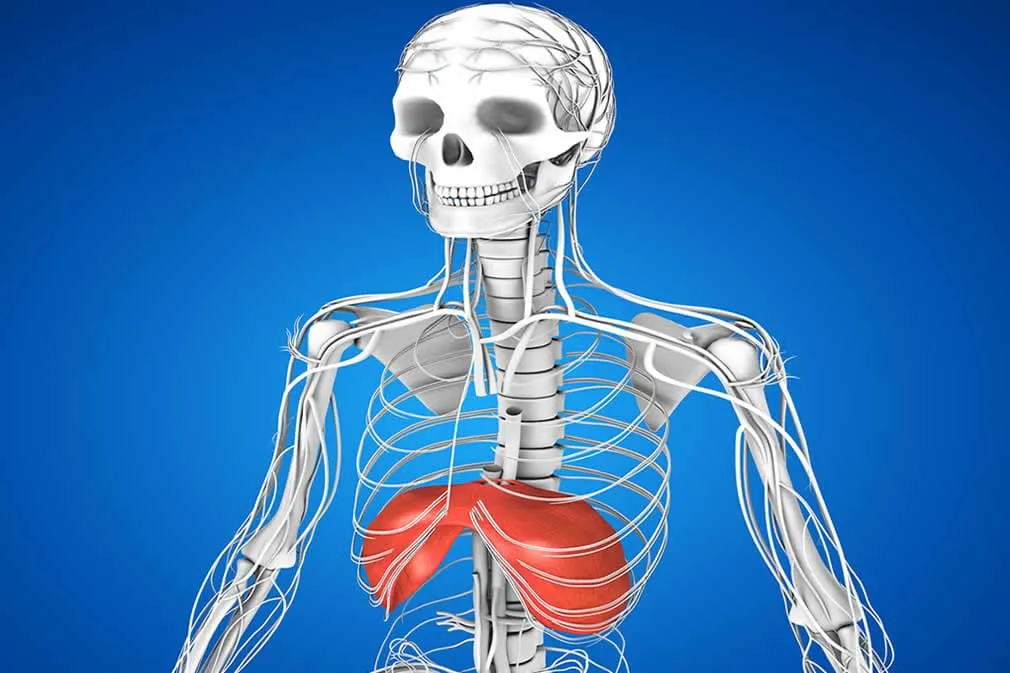
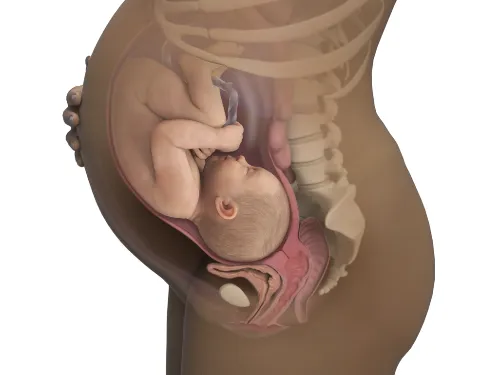
Understanding and managing sore ribs in pregnancy

Are you pregnant, and suffering from pain in and around your rib cage? Well you are definitely not alone – it is probably the second most common pregnancy-related complaint that we receive in our clinic, The Fix Program. If you’re wondering what the most common is, it is pelvic girdle pain.

Why do my ribs hurt in pregnancy?

During your pregnancy your body produces high levels of the hormone relaxin. This makes your ligaments stretchy, flexible, and pliable, and this very important to help allow your body to expand with the growth of your baby and get ready for the stretching required for giving birth in your pelvis. However, unfortunately there is increased laxity in ALL your ligaments, including those between each rib, and between your spine and breast bones. The ribs can easily be pushed into extreme and uncomfortable postures as the ligaments and tissues surrounding them stretch out and become painful.

Once you enter your third trimester, and as your baby becomes ever larger, the uterus expands right up beneath your rib cage. The lowest few ribs expand and flare out in response to your growing baby, putting them into a position they have never been before, dragging your soft tissues with them. This can definitely be a recipe for discomfort! This added stretching can place stress in between the ribs, or at their attachments to the spine at your back or breastbone at your front.


What does pregnancy rib pain feel like?

  • Pain in the ribs on one side more than the other
  • Tenderness to the touch
  • Pain in sitting, bending forward, or slouching
  • A deep ache or burn around the rib or upper back that makes sustained sitting difficult.
  • Painful coughing, sneezing, laughing, or deep breathing

How can I manage the pain and discomfort associated with pregnancy rib pain?

Often in pregnancy, many aches are short term as the resilient body adjusts and gets used to its new postures and physical stresses. This is also the case with rib pain. If you do suffer from rib pain, consider trying any or the following common treatment strategies.

  • Keep your posture straight and tall as often as you can – avoid sitting for long periods, especially in a slouched posture pulling on those ribs and ligaments even more.
  • Use heat or cold packs for 20mins at a time, whatever eases your pain more.
  • Move and stretch regularly! Remind yourself with a half hourly alarm, or even use the red dot postural reminders to make sure you do it often.
  • In some cases some gentle sports taping of the ribs may be helpful.
  • When sleeping, support yourself with pillows to get as comfortable as possible.
  • When stretching, target your thoracic spine, shoulders, and rib cage – just like we do in our pre-natal Pilates classes. Try the standing wall twist, or the Feldenkrais ‘bow and arrow’ for gentle free flowing movement of the upper trunk.
  • In a physiotherapy appointment we can provide massage that can relieve the pain from tight muscles while realigning your ribs and spinal joints as needed. Book in to see us, and we will also tailor an effective home exercise plan just for you.
  • Join an online class from the comfort of your home - Katrina the principle physio at The Fix Program has designed a series of pregnancy exercise programs that will help you immensely.  


When am I likely to feel better?

Each of the above measures should provide some relief almost straight away – the more you do, and the more often you do them, the better. However, some women may find that the pain will continue or return very quickly, especially in the third trimester. The good news is that this won’t last forever! At the 36-week mark the baby will start to drop lower into your pelvis, meaning some of the pressure will ease and often the rib discomfort along with it. For the minority who feel pain all the way through to delivery, it should completely disappear soon afterwards as your relaxin levels return to normal and your body doesn’t have to make room for a whole new person any longer!

For those who experience it, this rib pain is all part and parcel of growing your new child. We always want to know if you are struggling with this all too common pregnancy symptom, so please do not hesitate to call and book in with one of our Physios here at The Fix Program.

Read More

The importance of the diaphragm.

The importance of the diaphragm.

Why how you breathe matters!

Anyone who has spent enough time learning about exercise and mindfulness or meditation, comes across a rather strange idea – that there is more than one way to breathe. Most of the time we don’t think about breathing, our body breathes on its own without us having to tell it how! But knowing the full story behind “diaphragm breathing” will help you get deeper and more relaxed breathing, and will help you support your body in a safe, protective posture. 

What does the diaphragm actually look like inside my rib cage?

The diaphragm is a dome-shaped sheet of muscle which joins into the lowest few ribs, internally dividing the chest cavity from the abdominal cavity below. When it contracts it pulls itself down towards the bottom of the ribcage, causing the lungs to expand and fill with air. So, while you feel your chest go in and out while you breathe normally, this is not the primary way your lungs fill up – the internal motion of your diaphragm is actually doing most of the work.


Did you know that the diaphragm actually supports your posture too?

Your diaphragm works as the top of the deep system of core muscles surrounding your abdomen, with the pelvic floor at the bottom, the multifidus muscle at the back near your spine, and the transversus abdominus, or deep abdominal layer on the sides. This set of muscles forms a cylinder deep inside your midsection (your “deep corset”), working to support and stabilise the area and protect against injury.

An easy way to breathe better using your diaphragm

While the diaphragm is essential for all breathing, other muscles can get involved and get our bodies into bad habits. These can include the neck muscles creating increased neck tension, shoulder and chest muscles, closing the chest posture or the belly muscles. What we are going to focus on is making sure that the diaphragm is doing the right amount of work in the right way. 

  • Place your hands on your lower ribs and take in some deep breaths, just to feel how they move when you breathe normally.
  • Then try and keep taking those deep breaths, only now try and keep your ribs from moving back-to-front, letting them mostly just move side-to-side, feeling how they return close to the centre again when you exhale.
  • As you continue, see if you can minimise any changes to your back arch. When breathing with the diaphragm, no increase in your arch should be necessary. Just widening of the ribs into the side-seams of your shirt.
  • Check that the neck is be able to stay soft and relaxed as well, reducing any unnecessary effort in the process of deep breathing. 

How often do you think you breathe like this throughout your busy life? Bringing this peaceful kind of breathing into your waking life is going to help keep your body stable and happier. 

How does my breathing coordinate with the other core muscles?

  Your pelvic floor should mirror the movement of your diaphragm. It is great to try to remember that 

  • when you inhale and the diaphragm lowers, your pelvic floor should relax and drop, and
  • as you exhale and the diaphragm lifts, the pelvic floor muscles should also tighten and lift:

This can take a bit of practice, but it is the best way to make sure that “deep corset” of yours is working as effectively as it can. Try taking five deep breaths in a row, practising your coordination of diaphragm breath with the deep pelvic floor contraction and relaxation.

Now try also gently drawing in the lower abdomen with the exhales as well, making the sides of your deep corset or cylinder work together with the top and bottom. Try this fully coordinated breathing pattern five breaths in a row. 

Why should I do this? 

If you can successfully master the above exercise, you will have just activated all of your core muscles in a safe and supportive way that gently promotes good posture and injury prevention. This form of deep, wide, relaxed breath ensures your abdominal stabilisers wake up, which can in turn help with back and neck problems, improve your core strength, and help with pelvic floor function. It is also the way we breathe when we are most relaxed, and helps with our mental well-being. 

Join an online class from the comfort of your home - Katrina the principle physio at The Fix Program has designed a series of pregnancy exercise programs that will help you immensely.   

So whether it’s to help your sore back, before or during exercise, or just before someone passes you the microphone at karaoke, try breathing with your diaphragm and see how it serves your body and mind in a multitude of ways!

Read More

deQuervain’s Syndrome in new mums

deQuervain’s Syndrome in new mums

A fancy name for really sore wrists

A new mother’s life is full of changes to mind, body, and routine. One thing that is almost always a shock to the system is the amount of lifting and carrying new mothers suddenly need to do, moving baby from cot to pram to changing table and back again. In some cases a repetitive strain injury called tenosynovitis (or tendonitis) can develop – it is caused by chronic overuse and thickening of the tendons that run down your thumbs. This thickening of both tendon and sheath means painful movement as secondary inflammation sets in. This painful condition is called deQuervain’s Syndrome, though you might have heard of it as ‘Mother’s Wrist’, ‘Mummy Thumb’, or even ‘Washer Woman’s Syndrome!’

What does deQuervain’s feel like?

Those affected will feel pain in the thumb, the side of the wrist and hand, even down into the forearm. There is often also swelling on the thumb side of the wrist, sharp and/or chronic pain when moving the wrist and thumb, and weakness in grip strength in one or both affected hands. Continuing to try and push through the pain, repeating the same movements without treatment, will only make things worse.

Mothers with this pain and inflammation will usually find difficulty with:

  • Twisting of the wrist, like when screwing in a screw or opening a bottle top
  • Holding the thumb away from the palm and fingers, like during typing, playing the piano, even sports like bowling and golf
  • Moving your hands about your wrists, like in sewing or knitting
  • Lifting while gripping, like when pouring from a jug or picking up your baby!

Why have I developed these sore wrists?

Incidence of deQuervain’s syndrome is higher among women in their child bearing and rearing years, especially in pregnancy and in the early postnatal period. It is thought that several factors contribute to this, from repeated lifting of the infant using the thumbs as leverage and tilting the wrists towards the thumb side, to hormonal changes and increased fluid retention.

This movement of the wrist lifting is the cause of the injury and looks much like the way any new mum would pick up her baby repeatedly.

How can a physio help with deQuervain’s?

A physio can assist with managing the inflammation and offering braces and supports for the wrist during the painful time. Afterall, you still need to use your hands and forearms as you continue to care for your bub. Diagnosis of this pain is very simple and can be confirmed with simple feeling of the painful tendons and the Finkelstein test pictured below. You could almost assess yourself to see if you could be suffering from early signs of deQuervain’s by following this simple movement.

If you think your might have deQuervain’s Syndrome, it is very important that you do not ignore it.

Book in with one of our experienced Physiotherapists as soon as you can! We can offer a mix of the following treatments to allow the tendons to begin their healing and to therefore become less painful and inflamed. We can:

  • provide hands-on treatment, and provide you with gentle, targeted exercises that can relieve the pain.
  • most importantly, teach you how to perform your everyday tasks in a less stressful manner, so the strain isn’t repeated over and over, exacerbating the symptoms.
  • prescribe wrist splints for resting the wrist or for allowing movement in a less stressful way to the tendons for your daily activities of looking after your baby.
  • suggest anti-inflammatories to help you manage secondary inflammation and the associated pain, or cold packs applied to the area for 20 minutes a few times per day.

DeQuervain’s Syndrome is something that should be treated right away, and it can be identified quickly and treated relatively hassle-free. So let us know if your thumbs and wrists start to feel different, so we can get you back on track to helping your bub in an easy, pain-free way.

Read More

15 minute Pilates workout for pregnancy

15 minute Pilates workout for pregnancy

Make some floor space and enjoy this routine at home

During pregnancy, it’s important to keep your body strong, stable and flexible. As your body changes with the growth of your bundle of joy, surges of the hormone relaxin help the pelvic ligaments to stretch and make room for pregnancy and birth. This creates increased movement of the pelvic joints which can cause pains around the buttocks and pubic bones for some women. The weight of your developing baby pulls the lower back into a greater arch causing the muscles there to overwork and feel light and tired. As a compensation for your changing lower trunk postures, the upper back, chest and shoulders tend to stiffen.

But the good news is that some pregnancy specific exercises, when done 3-5 times per week, can help to counteract all this, reducing pain, stiffness, and improving stability. So I’ve put together a short home exercise program for mums to be to practice at home, 15 minutes at a time, 3-5 times per week, to help protect you throughout your pregnancy and prepare you for the birth and recovery process.

Important things to consider while exercising in pregnancy

  • Take exercise at a gentler pace; don’t push yourself to achieve new personal bests while pregnant.

  • Check with your doctor whether they are happy for you to exercise in your pregnancy.

  • Taking care of your pelvic floor muscles should be a priority. These muscles are under a lot of load as your baby grows, so learn how to correctly contract and relax them, and avoid high impact exercise and heavy lifting to avoid extra strain on them. To get the pelvis floor muscles to relax, think of a pebble dropping into a pond and sending ripples out in rings along the surface of the water. This is the pelvic floor relaxing, dropping and widening (great for labour when pushing out your little one). To tighten and lift it, think now of the reverse, the ripples returning to centre and the pebble being lifted up out of the pond.


  • Be aware of good alignment, posture and form to protect the spine, pelvis and hips which are all undergoing major changes. Before you start an exercise ask yourself, is my pelvis in its neutral zone? Are my waists long and spine tall?

  • Take into account the fact that the hormone relaxin is making your ligaments and joints more flexible and mobile, so keep movements smooth and gentle to protect your pelvic joints.

  • When to avoid all exercise and seek immediate medical opinion: if you are having vaginal bleeding, breathlessness at rest or with little exertion, decreased frequency of the baby’s movements, high levels of pelvic and/or back pain.

So with all of this considered and checked, try out these exercises. See it as time for you. And for the health of you and your baby.

Front Hip Stretch


The Goal

  • To stretch and release the front muscles of your hips, which tighten a lot with your tipped forward ‘pregnancy pelvis posture’.

The Exercise

  • Bend the knees and pop the fingertips onto the floor between the legs
  • Step the right leg a big stride out behind
  • Sink the pelvis heavy towards the floor
  • Hover the back knee off the floor
  • Hold this position for 30 seconds and then repeat on the other side
  • You should feel a stretch at the front of your hip on the back leg

Extra Tips

  • Imagine a heavy weight attached to your hip on the front leg side, and imagine that weight dragging that hip down towards the floor
  • Gently reach the hip of your back leg forward, and extend the heel out behind

Wall squat


The Goal

  • To strengthen your thighs, buttocks and upper arms – you will need good strength here for labour postures and when caring for your new bub.
  • To stabilise the trunk, neck, knees and shoulders in an ideal alignment throughout

Getting ready

  • Start with your back against the wall, with the tailbone flat against the wall, a little arch behind the lower back and flat ribs and upper back against the wall, and soft relaxed neck and shoulders
  • Set up your feet wider than the hips, and keep the knees as wide as the middle of each foot
  • Keep your pelvis neutral – imagine your pelvis is a big fruit bowl full of water and the water is level, not spilling out the front or back of the pelvic bowl.
  • Grow tall up both sides of your waist and notice that the pelvic floor and deep tummy gently engage

The Exercise

  • Inhale to prepare deep and wide
  • As you exhale, become aware that the pelvic floor and tummy are already gently engaged, and slide down the wall into a squat
  • Hold there and check that your knees are still wide in line with the feet, that the tailbone is still flat on the wall, the little arch behind the back has not changed, and the ribs and upper back lie flat on the wall
  • Gently slide your shoulder blades down the back away from the ears, open the chest and tuck your chin a little towards the middle throat
  • As you hold your squat, inhale, as your exhale engage pelvic floor, tummy
  • Repeat 8x as you hold your squat. Do this 4 times.
  • You should feel your thighs working hard.

Extra Tips

  • As you hold your wall squat, squeeze you buttocks for a moment and feel the sit bones under your pelvis seem to travel closer together. Then let the buttocks relax, and feel the sit bones widen. Keep the butt relaxed and the sit bones wide throughout the exercise.
  • Check that your tail bone stays flat on the wall and it’s tip does not curl under you, flattening the lower back arch as your thighs start to fatigue
  • Keep those shoulders gently back and down, and a softness in the neck
  • Keep breathing lovely deep, wide breaths
  • Imagine your feet resting lightly on egg shells or marshmallows, and the thigh bones drawing back into the hip sockets

Single Leg Floats


The Goal

  • To use the deep stabilising postural muscles of the trunk to maintain a great spinal and pelvic alignment as you move the legs. Your deep abdominal corset really needs to work hard in pregnancy and this exercise will help you achieve strength and endurance.

Getting ready

  • Lie on your back on a mat with your knees bent
  • Have your feet and knees hip width and check that your tail bone rests flat and heavy on the mat (this should give you a gentle arch behind your lower back)
  • Rest your hands on your ‘headlights’ (the pointy bones at the front of your pelvis) on each side to check that you are not rocking your pelvis in any direction.

The Exercise

  • Take an inhale deep and wide to prepare
  • As you exhale, lift the pelvic floor, draw the headlights together and float one leg up stopping with the knee over the hip, bent to 90 degrees
  • Stay for an inhale deep and wide and relaxed
  • As you exhale, lift the pelvic floor, draw the headlights together and lower the leg back down for a light controlled landing.
  • Repeat 4x each leg, alternating sides each time, for a total of 8 reps
  • You should feel the pelvic floor and the lower abdomen gently engaging to help control your posture

Extra Tip

  • Use the pelvic floor and deep tummy to keep your tailbone flat, the back arch the same shape, and prevent any rocking of the headlights side to side.
  • Imagine you have marshmallows or eggs shells underneath the soles of your feet again and you are not allowed to squash them throughout the exercise. Think light feet!

Toe Tapper in side lying

The Goal

  • To strengthen your buttock muscles that stabilise the hips and pelvis whilst maintaining ideal trunk posture. Keep those strong pert buttocks!

Getting ready

  • Lie on your side
  • Have your knees bent, feet back in line with your bottom, neck supported by a pillow or towel
  • Stack your hips one right over the other
  • Find your neutral lower back arch, tuck your ribs in at the front, and stack your shoulders one right over the other
  • Lift your lower waist a little off the mat to straighten out your spine

The Exercise

  • Take an inhale to prepare, deep and wide
  • As you exhale, acknowledge that the pelvic floor and deep tummy muscles are already gently engaged as you maintain a neutral spine and pelvis
  • As you inhale lift the top leg, heel first in line with the body
  • As you exhale engage the pelvic floor, deep tummy and lower the leg toe first to tap, tap, tap on the floor
  • Repeat 2 sets of 8, one each leg
  • You should feel you buttock working on the top leg side

Extra Tip

  • As you lift the leg, imagine the thigh bone being sucked up into the hip socket
  • Imagine your leg is a heavy, floppy, dead weight being dragged through thick honey
  • Keep the top hip forward and the foot back
  • Keep the knee and toe always facing the floor
  • Don’t let the back arch change shape or the pelvis rock and roll

Pidgeon Stretch


The Goal

  • To stretch and release your buttock muscles. A favourite of our pregnancy ladies.

Getting Ready

  • Set yourself up on all fours
  • Bend your right knee up in front of the body so that the knee is roughly mid-line and the foot rests under the left hip
  • Extend your left leg long and straight out behind you

The Exercise

  • Sink your hips down towards the floor
  • Rest your forehead on your forearms if that feels comfortable, or stay up with weight on your hands if that feels better
  • Hold for 30 seconds and then repeat on the other side
  • You should feel a stretch in the right buttock

Extra Tips

  • Reach your left hip down towards the floor gently
  • Imagine your right hip growing long away from your waist and ribs towards the foot end of your at

Bow and Arrow Stretch

The Goal

  • To stretch the muscles about your upper back, chest, ribcage and shoulders and encourage free movement of the spine and ribcage into rotation. Another favourite – really get into the zone and enjoy this!

Getting Ready

  • Lie on your right side with your neck supported by a pillow or rolled up towel and your knees bent
  • Stack your hips one directly over the other and bring your hands together out in front of your shoulders resting on the floor

The Exercise

  • Reach your left hand forward along the floor feeling that the arm stays relaxed and the movement comes from the upper back rotating
  • Draw your left arm back along your right and across your chest and out behind you to make a T shape
  • Fold the hand back to the chest and reach forward again to repeat
  • 10 x each way, and repeat on the other side
  • You should feel stretching around the upper back, shoulder, chest and ribs

Extra Tips

  • Imagine you are an archer drawing a big bow and arrow
  • Turn the upper body but keep the pelvis still
  • Turn your thumb to face the floor

Enjoy! If you’re struggling with pains around your pelvis despite your exercises, please let one of our staff know. We can help with hands on physiotherapy treatments, women’s health physiotherapy consults, and can fit you with pregnancy pelvic belts or compression shorts if they’re needed for a bit of extra support.

Read More

Pilates for your neck

Pilates for your neck

Pockets for your shoulder blades. A wonderful gift to your neck and upper back

shoulder blades 

Struggling with neck tension? A stiff upper back? Shoulder and arm pain? Headaches?

Have you ever asked yourself, “Are my shoulder blades in their pockets?” This trick will help you to hold your shoulder blades in the correct position, alleviating many common problems stemming from this area.

But what does this all mean?

Whether you are in our Fix Program Pilates classes or in physiotherapy treatment, we always emphasise that good pelvis position provides your lower back with a sturdy base. We know that poor pelvic stability and posture is regularly linked to back pain. At the other end of the spinal chain, there are many muscles criss-crossing your upper back and neck, many of them connecting to your shoulder blades. In fact, supporting the neck and shoulder girdles is their main function. In the same way as the pelvis, a well-situated pair of shoulder blades stabilises your shoulders, upper back, and neck by evenly distributing tension and stress across the area. If they are poorly positioned, they can make matters much worse.

 Let’s look closer at the important anatomy of the region

anatomy of shoulder

The shoulder blades (or scapulae) float around on top of your ribcage and some of the muscles that hold them in place are highlighted in the picture above.

The big neck muscles (trapezius) connect the neck, shoulder and upper back. If these muscles become tight from being overused ( such as too much PC work), they not only pull on your neck but also on the shoulder blade, which can cause a variety of knock-on effects in the other connected muscles. Your scapula can be pulled out of alignment ( such as sit too high or drop too low on your upper back) or be prevented from sitting flush against your body. This is the ‘winged’ look you see of some shoulder blades. 

How do I get these upper back muscles working in a balanced way about my shoulder blade?

Let’s try to set our blades in a good alignment together now.

  • Inhale and widen your shoulder blades across your upper back.
  • Exhale and lift the outer points of your shoulders slightly upwards, bringing your shoulders slightly backwards.
  • Imagine the lower tip of your shoulder blade gently sliding down your back and tucking into your latissimus dorsi (the purple muscle above), like a hand sliding into a jean pocket on your bum.
  • Once you feel them settle into their pockets, your shoulder blades will evenly distribute the stress and tension in your upper back and neck much better than before, so your neck will feel wonderfully free.

This is tricky to do well without the guidance of a physiotherapist, so feel free to ask one of us to check your technique. Less is definitely more – think tiny, subtle movements of the shoulder. Try setting your blades into this posture and holding it for 30 - 60seconds, ten times throughout your day; you’ll be surprised how much they jump out of their pockets when you’re not paying attention! The best time to do it is when you are using your arms. Why not try when:

  • you are sitting at your desk?
  • you are reading?
  • you are lifting groceries, laundry, bags, weights or children?
  • you are feeding your baby?
  • you are playing sport? during your golf swing, tennis serve, batting stroke.

I’m sure you get the idea. Try using red dots to remind you to reset your blades. You can read more about this at Exercises-to-break-poor-postural-habits

As you begin to hold your blades in their best possible position, your neck will begin to feel more free and soft, and your upper back more relaxed. But remember, be gentle as you slide your blades flatly into their muscular pockets and use them as they were intended – to support your entire upper body.

Read More

Exercises to break poor postural habits

Exercises to break poor postural habits

The Red Dot Program

red dots

Correcting your posture is a long road – bad postural habits feel so natural! While you are at The Fix Program, your physio leads exercises and continuously prompts you to adjust your positioning, but once you walk out the door it’s probably hard to maintain. The physio can’t hold you in the correct position all day or sit on your shoulder 24/7 reminding you to exercise and adjust – though I am asked frequently to provide this ‘service’! The treatments we provide are much less effective if they are undone in consistent, small ways away from the clinic or studio.

So what is the best way to work towards a good posture when the physio isn’t around? Become part of the Fix Red Dot Program! If you have done our beginners classes you may remember being given some Red Dot stickers to pop around your home and office, and here’s what it’s all about.

In your assessment and your ongoing classes, your physio will have picked up a few postural errors that you are making repeatedly. Common ones include:

  • Springing your ribs forward
  • Flattening your lower back arch, tipping water out the back of your pelvic bowl
  • Gripping your bottom muscles
  • Bearing more weight through one foot than the other
  • Bearing too much weight in the front or the back of your feet
  • Hitching your shoulders up and forwards
  • Tensing your neck and jaw
  • Turning your toes out, knees in
  • Poking your chin forward, dropping the big mango between your chin and chest
  • Leaving your pelvic floor and deep tummy muscles inactivated before and during big movements
  • Bending with your back rather than your legs.

Getting on top of your postural errors – brain training

Hopefully only some of these things apply to you! Whether it’s one or several postural bad habits, the first step is to be aware of them, and the second is to have the right manoeuvres to correct them. Jot these down somewhere - ask your physio next time you see them if you’re unsure.

Now think of the places or activities where these habits kick in – perhaps it’s while you’re working at your desk, in your car during peak hour, doing the dishes, changing nappies, or even just walking around the house. Jot those down too.

Time to break out the Red Dot stickers! Put these all around your home and office, making sure each location and activity on your list is covered. Put one on your computer monitor, one by the dishwasher, one on the rearview mirror, sink, laundry machine, feeding chair, changing table etc. You get the idea!

These dots are now triggers for your mind – whenever you see one it will cue up your correct posture, a reminder to develop the little physio in your own mind. Red Dots can mean:

  • “Think tall!
  • Neutralize your pelvis!
  • Let your butt go!
  • Tuck your chin in and float your ribs!
  • Relax your neck and shoulders!”

They can be whatever you need them to be. The continuous, daily corrections you make outside of your time in our clinic will ensure the treatments you receive stick, leading the way to a pain-free and relaxed posture. It’s just like having one of us cueing you over and over throughout your day, prompting you to refresh your posture and protect your body throughout those most aggravating activities for you.

After a week or so, take your dots down and move them all just a little. If you leave them in the same place for too long, they can blend into the background and won’t be as good at triggering your good postural habits. Don’t move them too far, just enough to jolt you each time you see one.

Best of luck, and let us know what you think. And remember if you need some Red Dots, don’t hesitate to ask us for them next time you’re at physio or class.

Read More

Physiotherapy, Pilates and pregnancy hormones

Physiotherapy, Pilates and pregnancy hormones

Is relaxin as good as it sounds? 

A woman’s body completely transforms during pregnancy, growing and stretching all over in a very short time. Supporting the growing weight requires all sorts of internal reorganising, particularly in the lower back and pelvis. The pelvis eventually becomes elastic enough to allow a baby to pass right through the middle of it – all of this, and more, thanks to the hormone relaxin

Where does it come from?

Relaxin is produced by the sex organs in both men and women, just like many other hormones. Each gender uses it to do different things, but it gets its name from its role in reshaping a pregnant woman’s body. Relaxin production surges within a few days of conception, and the uterus, placenta and breasts start making it too. Its levels are the highest in both the first trimester and at delivery – we’ll soon see why! 

What does it do?

The increased relaxin directs the body to reconfigure its blood flow – the mother’s organs will be working for two, and there is a lot of plumbing involved! By encouraging a widening or a relaxing of specific blood vessels, the body can pump more blood to where it needs to go (your baby via the placenta, the uterus). From there, the relaxin begins to suffuse into the ligaments of the lower back and pelvis, making them far stretchier than before:

The pelvis widens, ready to support the large and sudden increase in abdominal mass. The relaxin continues doing this work, surging once again at delivery – this is, of course, when the ligaments need to be at their absolute stretchiest, giving the baby just enough wiggle and room to escape.

plevis anatomy

The most affected ligaments are highlighted in red, with the arrows indicating the direction of movement.

So, what’s the downside?

Ligaments are usually tight and strong in non-pregnant people, serving to distribute force and weight evenly up and down the body. When they become relaxed and flexible, your muscles have to tighten, working harder to compensate. For pregnant women, this can mean a lot of strain in the pelvis, buttocks and lower back that only gets worse as the baby gets bigger and the ligaments even softer. 

What kind of effects does this have?

    pubic symphisis pain (PSP)

If the pain is concentrated at the front, it could be what is called pubic symphisis pain (PSP). The ligament responsible is located where your two pubic bones join together – right in the middle, above your genitalia. When it widens, or when one side rises or falls relative to the other, it can become extremely painful and tender to the touch. It is most commonly felt when

  • rolling in bed,
  • getting in and out of the car,
  • climbing stairs
  • or when just walking.

If you experience such pain, usually offering compression or stability about the joint may assist reducing pain and improving every day function. Wearing a pelvic stability belt can help reduce stretching in the affected area, while pelvic compression shorts will help the body hold the two halves of your pelvis together. Developing core stability before and during pregnancy will better prepare your supporting musculature – we know that deep abdominal and pelvic floor muscles can offer support and structure about the joint. This preventative strengthening can mean less chance of pain and a reduction of any pain already in this area of the pelvis. This is a big aim of our pregnancy specific classes offered at The Fix Program.

If the pain is on either side of the tailbone, right where your dimples are, it is called sacroiliac joint pain (SIJ). The pelvic bone or ilium (as it usually effects only one side) can move out of good alignment with the tailbone, leaving you with pain in the lower back or down through your buttocks or upper thigh. These joints are usually responsible for smoothly transferring weight from one leg to the other, so the pain is most commonly experienced during activities that involve standing on one leg while lifting the other, including

  • walking,
  • standing up from sitting,
  • rolling and standing up from bed,
  • or even getting dressed.

Fortunately, the treatment for any of these symptoms is the same as for pubic symphisis pain. This will include wearing pelvic compression garments, pregnancy-specific core stability exercises and stretches, and hands-on physiotherapy treatment.

Do the effects last?

The good news is that your ligaments will likely return to normal once the relaxin returns to its normal levels and you are no longer weight-bearing for two. Of those that experience either type of pain during their pregnancy, four out of five women have their discomfort spontaneously resolve within three months after the birth. For the unlucky Ms. Five, there is a lot understood about the pain and many ways that the Fix physiotherapists can help you out!

Relaxin is an amazing part of the incredible transformation of pregnancy, playing an essential role in preparing a woman’s body for the task of sustaining and delivering a new life. These changes might be challenging or painful for your body, which is why the Fix team will be ready to help you before, during and after the arrival of your new baby.

Read More

Dry needling and physiotherapy

Dry needling and physiotherapy

Tabitha explores the fantastic effects of needling

Dry Needling is an exciting technique in physiotherapy (essentially Physiotherapy’s version of acupuncture). Katrina and I recently trained in this at a course in Darling Harbour. It has become another powerful tool in our tool belt when we treat our patients.

What is dry needling?

Small, ultrafine needles allow physiotherapists to target many important structures in your body affecting your movement. There are multiple applications, though each involves a needle and a few minutes with it sitting in the right position.

For example, the site where your muscle tendons join into bone can easily become thickened and irritated when overused over long periods. When a dry needle is inserted there, your body is provoked into responding to this otherwise overstimulated region. In much the same way, irregularities in your muscle tissue – both small and large – can appear when your body is adapting to excessive or abnormal tissue load. These can cause pain and other negative effects such as tightening and swelling and can be treated directly and indirectly with dry needles. Even swelling from acute injuries like ankle sprains is treatable this way.

With needling, we aim to disrupt a complex mechanism of activity involving interactions between the brain, nerves, blood vessels, hormones, chemical responses and the soft tissues of the body (ie muscles, ligaments and skin). These complex changes can cause abnormal loading/irritation of the tissues and less than ideal patterns of movement. The needles act like a combination of spotlight, alarm and jump start – the foreign stimulus causes your body to abandon its dysfunctional habits and return to a more normal state and movement.

Here’s a shot of Katrina with some needles I put in at out course in July. See, she looks nice and comfortable!

Does dry needling hurt?

Many patients are concerned about how it might feel, though in reality it is often much less painful than most treatments we perform! There is sometimes a feeling like a pinprick when we insert and remove the needles – similar to the feeling you’d get if you plucked a single hair from your head. In some people, a small drop of blood or bruise might appear. Depending on the site and the length of the treatment, you may also feel tingling (especially near nerves) or aching (near bone). Occasionally when needling the upper body you may become light headed or have an unexpected emotional response. But these will be monitored for and addressed if they do occur.

Personally, having upper body needling done in my arm makes me feel like I’ve had a lovely glass of wine, very relaxed!

Of course, we follow a strict sterilization technique and use single use, disposable needles, ensuring the slight discomfort of the technique (if any) is the only thing you have to worry about. For most patients it is surprisingly comfortable and produces very satisfying and impressive results.

Often you will have your physio combining dry needling with massage, joint mobilisations and re-alignment techniques to give you the best out of your treatment.

If you’re interested in dry needling, ask one of The Fix Program physios if it’s right for you!

Read More

Post-natal Pilates with bub

Post-natal Pilates with bub

Make time and enjoy our 15 minute post natal Pilates workout for you and baby

In the first few weeks after you give birth, it may feel unsafe to exercise – or you might never have enough time away from your bub to focus on your recovery.

This set of stretches and exercises is designed to safely help your body back to full strength after pregnancy and childbirth. We would recommend that you wait 4 weeks after having baby to start on these, but don’t forget to work on your pelvic floor lifts as soon as possible after the birth.

We recommend also our 1 hour post-natal check up would help you to discuss any concerns about your pelvic floor, spinal health and abdominal separation post-baby. We can direct and further target your exercise program for home also at this checkup. Call us for more details

Do you find it nearly impossible to remember to do your pelvic floor exercises?

Try to associate doing them with another activity, such as taking a drink of water, changing nappies or feeding times.

Do you not feel much of a lift or activation down below?

Don’t worry. This is very normal in the early days and weeks after having a baby. Don’t stop ‘doing’ your pelvic floor lifts however. Your brain is still connecting to these muscles every time you send the message, which is all very important. Your pelvic floor is probably take some time off to recooperate after your pregnancy and birth. Perhaps the pain of having stitches (or not) has switched the muscles off for a little while. They will start to get going very soon.

Once you can feel some small ‘closing and lifting’ of the pelvic floor hammock, you can begin to enjoy these exercises. These fifteen minutes each day are also bonding time with your new bundle of joy - your baby forms an integral part of each exercise! All you need is a mat and a pillow or towel.

 Leg rolling and out and in 

Getting ready

  • Lie on your back on a mat with your knees bent and your baby lying on your belly or chest

  • Have your feet and knees hip width and check that your tail bone rests flat and heavy on the mat (this should give you a gentle arch behind your lower back)

  • Rest your hands on your ‘headlights’ (the pointy bones at the front of your pelvis) on each side to check that you are not rocking your pelvis in any direction.

    Exercise

  • Breathe in deep and wide as you allow the right knee to roll slowly out to the side

  • Breathe out, gently lifting the pelvic floor and drawing the headlights together as you draw the knee back to centre

  • Repeat 5 times each leg, alternating legs each time

    Hot tips

  • Keep your pelvis still, and don’t let your lower back to arch or flatten

  • Keep a heavy feeling in your tailbone, focus on keeping it flat on the mat behind you

  • As you draw the headlights together at the front, check that your lower abdomen draws in and does not dome outwards

  • The leg that is not moving should stay quite still as you roll the other out and in. Imagine that hip is heavy, weighted in place

  • Allow the thigh, calf and butt muscles to feel soft, relaxed and heavy. Imagine your legs are being dragged through thick honey, resisting your movements

Bird Dog 


 Getting ready

  • Stay on all fours with your baby between your hands looking up at you or having tummy time
  • Find your neutral pelvis and small lower back curve
  • Keep your lower ribs from sinking down in the middle
  • Draw your shoulder blades gently down your back, away from your ears, and grow long up the back of your neck

       Exercise

  • Breathe in deep and wide and extend the opposite arm and leg away from centre (in front and behind)
  • As you breathe out, gently lift the pelvic floor, draw the headlights together and bring the arm and leg back to the starting position
  • Repeat, alternating sides, four times each way for a total of eight

     Hot tips

  • Keep your pelvis neutral and your lower back arch from increasing or decreasing
  • Keep your shoulder blades drawn gently away from your ears
  • Imagine you are gently holding a big mango between chin and chest. Don’t drop it!
  • You should feel the pelvic floor, tummy, shoulders, butt and thighs all working gently

The Clam 

 Getting ready

  • Lie on your side with your baby in front of you
  • Have your knees bent, feet back in line with your bottom, neck supported by a pillow or towel
  • Stack your hips one right over the other
  • Find your neutral lower back arch, tuck your ribs in at the front, and stack your shoulders one right over the other
  • Lift your lower waist a little off the mat to straighten out your spine

Exercise

  • On a wide breath in, squeeze your heels together and lift the top knee in line with your body
  • As you exhale gently lift the pelvic floor, deepen the naval and smoothly lower the knee
  • Repeat eight times on each side

 Hot tips

  • You should feel the top buttock working hard
  • Keep your top hip still, not allowing it to roll back at you lift the knee
  • Try to keep your small lower back arch the same shape, not tucking the bottom in or flattening your back
  • Imagine your leg as a floppy, heavy, dead weight dragging through thick honey

Lunges with bub 


     Getting ready

  • Stand facing a full length mirror with your baby held facing the mirror, low down in front of your hips with your arms relatively straight, hands hooked between their legs for support
  • Starting with your feet hip width apart, step your left foot forward then your right foot back
  • Keep your pelvis neutral – your right foot should be on tip toes. Check you have not twisted back on the right side, find your neutral zone and grow tall

     Exercise

  • Breathe in deep and wide as you bend both knees and lower yourself straight down

  • Breathe out, lifting the pelvic floor, gently deepening the naval to the spine and push back up

  • Repeat 2 sets of eight on each leg

  • Most of your weight should be through your back leg, and the front of that thigh should be working hard

  • Keep your pelvis neutral, not tucking your tailbone under or flattening your lower back arch

  • Make sure you drop your hip on the front leg side, not keeping it hitched up towards your ribs and shortening your waist – this will help your butt to work on the front leg side

Cat Stretches

      Getting ready

  • Kneel on all fours, hands under your shoulders and knees under your hips
  • Pop your baby on the floor on their back, looking up at you

      Exercise

  • Breathe in and round your back up towards the ceiling like a cat, bringing your chin to your chest and pressing through your arms
  • Breathe out and sink down through the middle of your back, drawing your head and tailbone high
  • Repeat five times each way

 Hot tips

  • Keep your shoulders still, always directly above your wrists, and pivot around them

Thread the Needle

     Getting ready

  • Stay on all fours from the previous exercise
  • Pop your baby off to your left side next to your hands, about an arm’s reach away
  • Find a neutral pelvis by rocking it forward and back and settling where you have just a gentle little lower back arch

     Exercise

  • Lift up your right hand and reach it through underneath your left arm, turning from the waist not the hips
  • Reach towards your baby and give them a pat, a tickle or a touch on the nose
  • Come back to centre, then repeat four more times, and again 5 times to the other side with your baby off to the right

Hot tips

  • You should feel the stiff upper back, ribcage and shoulder get a lovely stretch
  • Keep that gentle lower back arch the same shape as you turn, not allowing it to get bigger or smaller
  • Repeat five times each way

For best results repeat the whole program at least three to five days per week. Try this routine out the next time you are alone with your new baby – it will do you both a lot of good and prepare your body for returning to more intense exercise between six weeks and three months after the birth.

These exercises are safe for a new mum and are starting to return your body’s core or inner strength. Remember this is essential before moving onto your outer strength, or running and other high impact exercises. If you are at worried, please chat with us.

Our 1 hour post-natal check up would help you to discuss any concerns about your pelvic floor, spinal health and abdominal separation post-baby. We can direct and further target your exercise program for home also at this checkup.

Read More

Why does the front of my hip pinch?

Why does the front of my hip pinch?

What can physiotherapy and exercise do to fix my hip?

Hip anatomy 101

Your hip joint is a “ball and socket” - the ball sits atop your femur, or thigh-bone - this round portion is called the “head” of the femur. The head fits into the socket in your pelvis. The socket fits tightly around like a baseball glove, and the joint is surrounded by a joint capsule made of strong connective tissue. The joint capsule ensures the ball stays within the socket, while your muscles guide the rod of the femur around the socket smoothly to allow full range of movement of the hip.

At least, that is what is supposed to happen!

What can go wrong?

If you ever feel hip pain or catching deep in the front of your hip, you could have femoroacetabular impingement (FAI). Simply, a ‘pinchy hip’.

The movements most often associated with this condition are pulling your knee up, turning it inward or bringing it across your body - especially when all of these are combined at the same time, as seen by the picture below. This impingement, or blocking of joint movement can be due to a malformation of the bones involved in the ball and socket, and can affect anyone, from the young and physically active to the middle-aged and above. It is both painful and limiting to your movement.

What does it feel like?

The pain typically occurs deep within your groin or the front of your hip, though it can affect your outer hip or buttock in rare cases. The joint usually feels stiff and sharply restricted in motion in the directions mentioned above. It may affect only one joint, so it could feel very different to your other hip by comparison. It may come on suddenly after an injury or build up over time with age and joint wear and tear.

Why does it happen? 

The deformation of the bones in the joint could be congenital (from birth) or build up over time in response to overuse or trauma. Some typically affect younger people, especially athletes. If the muscles surrounding the socket - typically the hip flexors and internal rotators - are overused and become tight, the ball is pulled forward in the socket, causing a shrinking of the back of the joint capsule. As the head of the femur is pushed toward the front of the hip and down, it grows larger and further down the bone.

These same factors can build up gradually over long periods of time, typically affecting older people.

Things that aggravate it: What makes it worse?

The movement(s) that cause the bones to knock together will result in a catching pain. If you have hip impingement, you will most likely notice it while:

-Sitting for a long period of time

-Walking, running

-Crossing your legs

-During or after leg exercise

How can physio/Pilates help?

If you think you may have this type of hip pain, see your Physiotherapist for a complete testing and diagnosis. If we suspect you have it, we can do the following such as:

  • applying pressure through your hip joint to stretch out your stiff joint capsule

  • massaging to loosen and release the tight muscles in the area of the hip, especially in the back of the hip and buttock area

  • provide you with a range of exercises to improve the range and control you have in your affected hip. These will help you to draw the ball back and down as you move into triggering positions thereby avoiding bone on bone catching as much as possible.

If necessary, you can consult a doctor to advise on pain and anti-inflammatory medicine, and in severe cases a surgical consult may be a necessary step to ensure best treatment and management of FAI. If surgery is required, your physio will play a vital role in your post-operative care to ensure you make a full recovery.

Exercises for hip impingement

Push the head of the femur back. Lie on your back and lift the knee of your affected leg directly above your hips. Clasp your hands over your knee and push directly down through the line of your thighbone towards the floor. Do two sets of ten, applying firm pressure.

Push the head down, socket out. Stand with your feet wide apart. While keeping your affected leg straight, bend your other knee and fold through the hips, pushing your bottom out as you go. Once you feel the inner thigh of your affected leg stretch, use your hand to firmly press down on your upper thigh - make sure your hand is as high up as possible, near the groin. Do two sets of ten.

Stretch the front of your hip. Kneel on the knee of your affected leg and bend your other leg up in front of you. Rest your hands on either side of your front foot and press your hips forward and down towards the ground. You should feel a stretch across the front of your affected hip, hold it for 30 seconds and repeat.

These mobilising and alignment exercises should be coupled with a precise exercise program of hip and pelvic stability strengthening exercises to optimally return good strength, support and movement control about the hip region.

Join an online class  from the comfort of your home - Katrina the principle physio at The Fix Program has designed a series of Pilates exercise programs that will help you immensely.

Read More

Showing 10 of 16 articles by Tabitha

Fix News