The Fix Program Blog

6 Jul 2014 BY Heba Shaheed POSTED IN Pregnancy , Women's Health

Pregnancy and Incontinence

World Continence Week raises awareness for pregnant women world-wide

Urinary incontinence is a loss of bladder control which results in leaks of urine. This can be stress incontinence which is leaking urine with a cough, sneeze, laugh, exercise (including running, jumping, lifting weights), or even during sex. Or it can be urge incontinence which is a strong overwhelming desire to urinate and losing control before reaching the bathroom. Women over the age of 35 and women with a high BMI have a greater risk of both stress and urge incontinence during pregnancy and after birth.


Why can women suffer from incontinence during pregnancy?

It is quite common for women to develop some form of incontinence during pregnancy, and the most common form is stress incontinence. There are many reasons for this but the biggest reason is the extra weight of the unborn baby and the pressure of the uterus on the bladder. This is why pregnant women can often only develop incontinence in their third trimester. Sometimes constipation can also lead to incontinence because of the added pressure of the full bowel on the bladder.

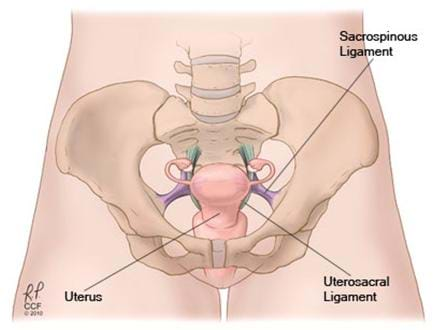
One other major reason is the large hormonal changes in pregnancy, which make the connective tissue including the ligaments very soft and lax. Women need their joints and tissues to be more elastic (particularly around the pelvis) for childbirth, but this also reduces the support of the bladder, hence why some women will leak. This extra weight and pressure combined with the laxity of the joints puts added pressure on the pelvic floor muscles. Pelvic floor muscles will then fatigue quicker, and if the pelvic floor muscles are already weak, it can lead to incontinence.

Why is incontinence prevalent after pregnancy and birth?

Leaking is common in one in three women after childbirth. Sometimes women lose their ‘connection’ (brain message to muscle) to their pelvic floor muscles after childbirth and the muscles weaken. Perhaps it is the pain associated with the birth and its interventions which cause this. This weakness means the muscles can’t tighten around the urethra efficiently and a leak can occur. Sometimes these pelvic floor muscles can become weaker due to prolapse, or sagging, of any of the pelvic organs, which puts extra load and pressure on the pelvic floor muscles.

After childbirth, the biggest risk factor for stress incontinence is having a vaginal delivery, especially if instruments such as forceps or vacuum were used, as these can injure pelvic nerves and muscles. Other risk factors include having your first baby, having a large baby over 4 kilograms, having a long labour, especially the second stage of labour, and having a difficult vaginal delivery, which involve stitches or tears around or outside the vagina. If a woman has tearing of her perineum or prolapse of her bowels, she may also develop faecal incontinence. Women who have had caesarian sections can also develop incontinence especially if their pelvic floor muscles are weakened from the pressure of the uterus.

Is there anything that can be done to prevent pregnancy-related incontinence?

It is important for all women to do their pelvic floor exercises during pregnancy and after childbirth. An excellent way to do these exercises and help to manage or prevent incontinence is to join a Pregnancy Pilates group exercise program, such as those offered at The Fix Program. After you’ve given birth, it is highly advised to see a women’s health physiotherapist if you are experiencing any incontinence to make sure you get the therapy you need. At The Fix Program our women’s health physiotherapists are highly skilled in assessing pelvic floor function and can help you manage any incontinence as well as treat any prolapse or scar tissue you might have post-birth.


4 Jul 2014 BY Tabitha POSTED IN Pilates , Pregnancy

Post-natal Pilates with bub

Make time and enjoy our 15 minute post natal Pilates workout for you and baby

In the first few weeks after you give birth, it may feel unsafe to exercise – or you might never have enough time away from your bub to focus on your recovery.

This set of stretches and exercises is designed to safely help your body back to full strength after pregnancy and childbirth. We would recommend that you wait 4 weeks after having baby to start on these, but don’t forget to work on your pelvic floor lifts as soon as possible after the birth.

We recommend also our 1 hour post-natal check up would help you to discuss any concerns about your pelvic floor, spinal health and abdominal separation post-baby. We can direct and further target your exercise program for home also at this checkup. Call us for more details

Do you find it nearly impossible to remember to do your pelvic floor exercises?

Try to associate doing them with another activity, such as taking a drink of water, changing nappies or feeding times.

Do you not feel much of a lift or activation down below?

Don’t worry. This is very normal in the early days and weeks after having a baby. Don’t stop ‘doing’ your pelvic floor lifts however. Your brain is still connecting to these muscles every time you send the message, which is all very important. Your pelvic floor is probably take some time off to recooperate after your pregnancy and birth. Perhaps the pain of having stitches (or not) has switched the muscles off for a little while. They will start to get going very soon.

Once you can feel some small ‘closing and lifting’ of the pelvic floor hammock, you can begin to enjoy these exercises. These fifteen minutes each day are also bonding time with your new bundle of joy - your baby forms an integral part of each exercise! All you need is a mat and a pillow or towel.

 Leg rolling and out and in 

Getting ready

  • Lie on your back on a mat with your knees bent and your baby lying on your belly or chest

  • Have your feet and knees hip width and check that your tail bone rests flat and heavy on the mat (this should give you a gentle arch behind your lower back)

  • Rest your hands on your ‘headlights’ (the pointy bones at the front of your pelvis) on each side to check that you are not rocking your pelvis in any direction.

    Exercise

  • Breathe in deep and wide as you allow the right knee to roll slowly out to the side

  • Breathe out, gently lifting the pelvic floor and drawing the headlights together as you draw the knee back to centre

  • Repeat 5 times each leg, alternating legs each time

    Hot tips

  • Keep your pelvis still, and don’t let your lower back to arch or flatten

  • Keep a heavy feeling in your tailbone, focus on keeping it flat on the mat behind you

  • As you draw the headlights together at the front, check that your lower abdomen draws in and does not dome outwards

  • The leg that is not moving should stay quite still as you roll the other out and in. Imagine that hip is heavy, weighted in place

  • Allow the thigh, calf and butt muscles to feel soft, relaxed and heavy. Imagine your legs are being dragged through thick honey, resisting your movements

Bird Dog 


 Getting ready

  • Stay on all fours with your baby between your hands looking up at you or having tummy time
  • Find your neutral pelvis and small lower back curve
  • Keep your lower ribs from sinking down in the middle
  • Draw your shoulder blades gently down your back, away from your ears, and grow long up the back of your neck

       Exercise

  • Breathe in deep and wide and extend the opposite arm and leg away from centre (in front and behind)
  • As you breathe out, gently lift the pelvic floor, draw the headlights together and bring the arm and leg back to the starting position
  • Repeat, alternating sides, four times each way for a total of eight

     Hot tips

  • Keep your pelvis neutral and your lower back arch from increasing or decreasing
  • Keep your shoulder blades drawn gently away from your ears
  • Imagine you are gently holding a big mango between chin and chest. Don’t drop it!
  • You should feel the pelvic floor, tummy, shoulders, butt and thighs all working gently

The Clam 

 Getting ready

  • Lie on your side with your baby in front of you
  • Have your knees bent, feet back in line with your bottom, neck supported by a pillow or towel
  • Stack your hips one right over the other
  • Find your neutral lower back arch, tuck your ribs in at the front, and stack your shoulders one right over the other
  • Lift your lower waist a little off the mat to straighten out your spine

Exercise

  • On a wide breath in, squeeze your heels together and lift the top knee in line with your body
  • As you exhale gently lift the pelvic floor, deepen the naval and smoothly lower the knee
  • Repeat eight times on each side

 Hot tips

  • You should feel the top buttock working hard
  • Keep your top hip still, not allowing it to roll back at you lift the knee
  • Try to keep your small lower back arch the same shape, not tucking the bottom in or flattening your back
  • Imagine your leg as a floppy, heavy, dead weight dragging through thick honey

Lunges with bub 


     Getting ready

  • Stand facing a full length mirror with your baby held facing the mirror, low down in front of your hips with your arms relatively straight, hands hooked between their legs for support
  • Starting with your feet hip width apart, step your left foot forward then your right foot back
  • Keep your pelvis neutral – your right foot should be on tip toes. Check you have not twisted back on the right side, find your neutral zone and grow tall

     Exercise

  • Breathe in deep and wide as you bend both knees and lower yourself straight down

  • Breathe out, lifting the pelvic floor, gently deepening the naval to the spine and push back up

  • Repeat 2 sets of eight on each leg

  • Most of your weight should be through your back leg, and the front of that thigh should be working hard

  • Keep your pelvis neutral, not tucking your tailbone under or flattening your lower back arch

  • Make sure you drop your hip on the front leg side, not keeping it hitched up towards your ribs and shortening your waist – this will help your butt to work on the front leg side

Cat Stretches

      Getting ready

  • Kneel on all fours, hands under your shoulders and knees under your hips
  • Pop your baby on the floor on their back, looking up at you

      Exercise

  • Breathe in and round your back up towards the ceiling like a cat, bringing your chin to your chest and pressing through your arms
  • Breathe out and sink down through the middle of your back, drawing your head and tailbone high
  • Repeat five times each way

 Hot tips

  • Keep your shoulders still, always directly above your wrists, and pivot around them

Thread the Needle

     Getting ready

  • Stay on all fours from the previous exercise
  • Pop your baby off to your left side next to your hands, about an arm’s reach away
  • Find a neutral pelvis by rocking it forward and back and settling where you have just a gentle little lower back arch

     Exercise

  • Lift up your right hand and reach it through underneath your left arm, turning from the waist not the hips
  • Reach towards your baby and give them a pat, a tickle or a touch on the nose
  • Come back to centre, then repeat four more times, and again 5 times to the other side with your baby off to the right

Hot tips

  • You should feel the stiff upper back, ribcage and shoulder get a lovely stretch
  • Keep that gentle lower back arch the same shape as you turn, not allowing it to get bigger or smaller
  • Repeat five times each way

For best results repeat the whole program at least three to five days per week. Try this routine out the next time you are alone with your new baby – it will do you both a lot of good and prepare your body for returning to more intense exercise between six weeks and three months after the birth.

These exercises are safe for a new mum and are starting to return your body’s core or inner strength. Remember this is essential before moving onto your outer strength, or running and other high impact exercises. If you are at worried, please chat with us.

Our 1 hour post-natal check up would help you to discuss any concerns about your pelvic floor, spinal health and abdominal separation post-baby. We can direct and further target your exercise program for home also at this checkup.


27 Jun 2014 BY Katrina Tarrant POSTED IN Physiotherapy

The susceptible shoulder joint

Why you don’t need to be a tennis player to suffer from a painful shoulder

With the Wimbledon tennis tournament having started this week, it got me thinking about the incredible amount of training and the slogging of tennis balls that players must endure in preparation and on the court. Hitting a tennis ball with great power as they do puts such an incredible strain on the joints and soft tissues of the arm. This is particularly so at the elbow and the shoulder.

Today I will explore the common injuries at the shoulder joint in tennis players. However, as sport physios we see these injuries very commonly in a large proportion of the population. Let’s take a look at the injuries and how to they are best managed through physiotherapy and exercise.

Why is the shoulder so susceptible?

The shoulder joint has great mobility and inherent instability. It is a shallow ball and socket joint and therefore has a heavy reliance on the soft tissue support, including the ligaments and muscles. Stability of this region also comes from a coordinated control of muscular activations, or good muscular ‘balance’.

Because of this heavy dependence on muscular support for the shoulder, injuries are common in these muscles. Muscles and tendon strains can occur frequently with overstretching or overloading. This is especially so with ballistic or high power arm movement such as with throwing, tennis shots and serves. Improper warm up, poor strength and condition, or fatigue of the muscles can result in strain. Not only do the shoulder muscles need to generate power for the tennis shots, but also decelerate or slow the swinging arm. This is a huge amount of work load on little muscles about the region.

Poor neck and upper back postures in us non- tennis players can cause the same gradual wear and tear of these muscles and soft tissues. The common postures such as the ‘slumped spine’ or ‘poke chinned’ posture can set up a multitude of poor shoulder postures and therefore risk of injury and pain in the arm.

What is the rotator cuff?

You have possibly heard about the rotator cuff through time spent at the gym, or at our Fix classes. But what is it and why is it so important for a healthy and happy shoulder?

The rotator cuff is actually a ‘cuff’ or fan of 4 muscles. These 4 muscles run across the shoulder blade surface and attach to the shoulder joint up near the tip of the shoulder. They are essential for controlling the movement precision required at the shoulder when elevating or reaching upwards with the arm. They are considered the stabilising muscles of the shoulder and also keep the arm bone (or humerus) set into the joint, effectively stopping it from slipping down your arm. The most commonly heard rotator cuff muscle is the supraspinatus.

Pain associated with this cuff is usually felt down the arm a little from the tip of the shoulder. Wear and tear of these tendons, or small tears can occur due to their location in the top of the shoulder, or repetitive overhead motions of the arm such as with tennis serves or with a painter painting your ceilings all day long. It can be thought of as a pinching type erosion of the structures in the top of the arm, or impingement.

What is shoulder joint impingement?

Impingement is a very common injury of the shoulder. It is most frequent in occupations of sports involving over head activity. It can also be caused by old age, shoulder muscle weakness, poor shoulder joint stability or movement, and bony deformities. Many structures at the top of the shoulder can become inflamed, swollen and ‘pinched’, including the rotator cuff tendons, the biceps tendon, the fluid filled cushions, called bursa and ligaments.

Pain is felt on elevation of the arm and can again refer into the upper arm.

What about any other shoulder conditions?

There are a full host of shoulder problems and disorders that have not been mentioned here, from frozen shoulders to dislocations to those shoulder pains that may actually be referred from the close by neck and upper back nerves.

Am I always going to be stuck with a painful shoulder?

The short answer is ‘no’. The shoulder may be a complex joint, but as a result and in most cases, strengthening programs offer the best long term solution. Classes like ours at The Fix Program where there is a strong focus on good spinal, neck and shoulder blade alignment offer a fix to the cause, not just a bandaid for the pain. Sure, massage and physio, ice and taping can help also with the pain initially, but getting to the root cause of the movement problem and muscle weakness will prevent pain, swelling and injury in the future.

Exercises aimed at good shoulder blade posture such as

  • the diamond press
  • the dart
  • the cobra,

and visual and movement cues such as

  • slide your blades into their pockets
  • melt your shoulders from your ears
  • pivot your arm from the shoulder point
  • gently lengthen through the base of the skull
  • hold your mango under your chin,

will all assist in returning the upper back and shoulder region into a good movement control. Thoracic stretches and chest stretches will also aid good alignment. Even those over the favourite bolsters!

For some, the damage may be too great on the tendons and soft tissue about the shoulder joint. In this instance, surgery may be required (as a last resort- the rehab after shoulder operations is very very intensive), or an injection of cortisone into the injured structure to try to calm inflammation and encourage healing.

Regardless, you will get to know and love your physiotherapist very well, as they take you through a structured and slow course of treatment and exercise therapy to restore the shoulder and upper back to a well-oiled machine!

If you are at all worried about shoulder pain, get onto it early. As with most niggles, early intervention prevents a greater problem. Your physio will assess and work out what structure is involved - whether it be in the shoulder or neck- and start your road to recovery. Be prepared to work hard on it and you will get good long lasting results.


Fix News