The hidden cause of your runner’s knee, back pain, and sluggish times
You’ve heard of tight hamstrings. Tight calves. But when was the last time you thought about your hip flexors? If you’re like most runners, probably never — until they start causing problems.
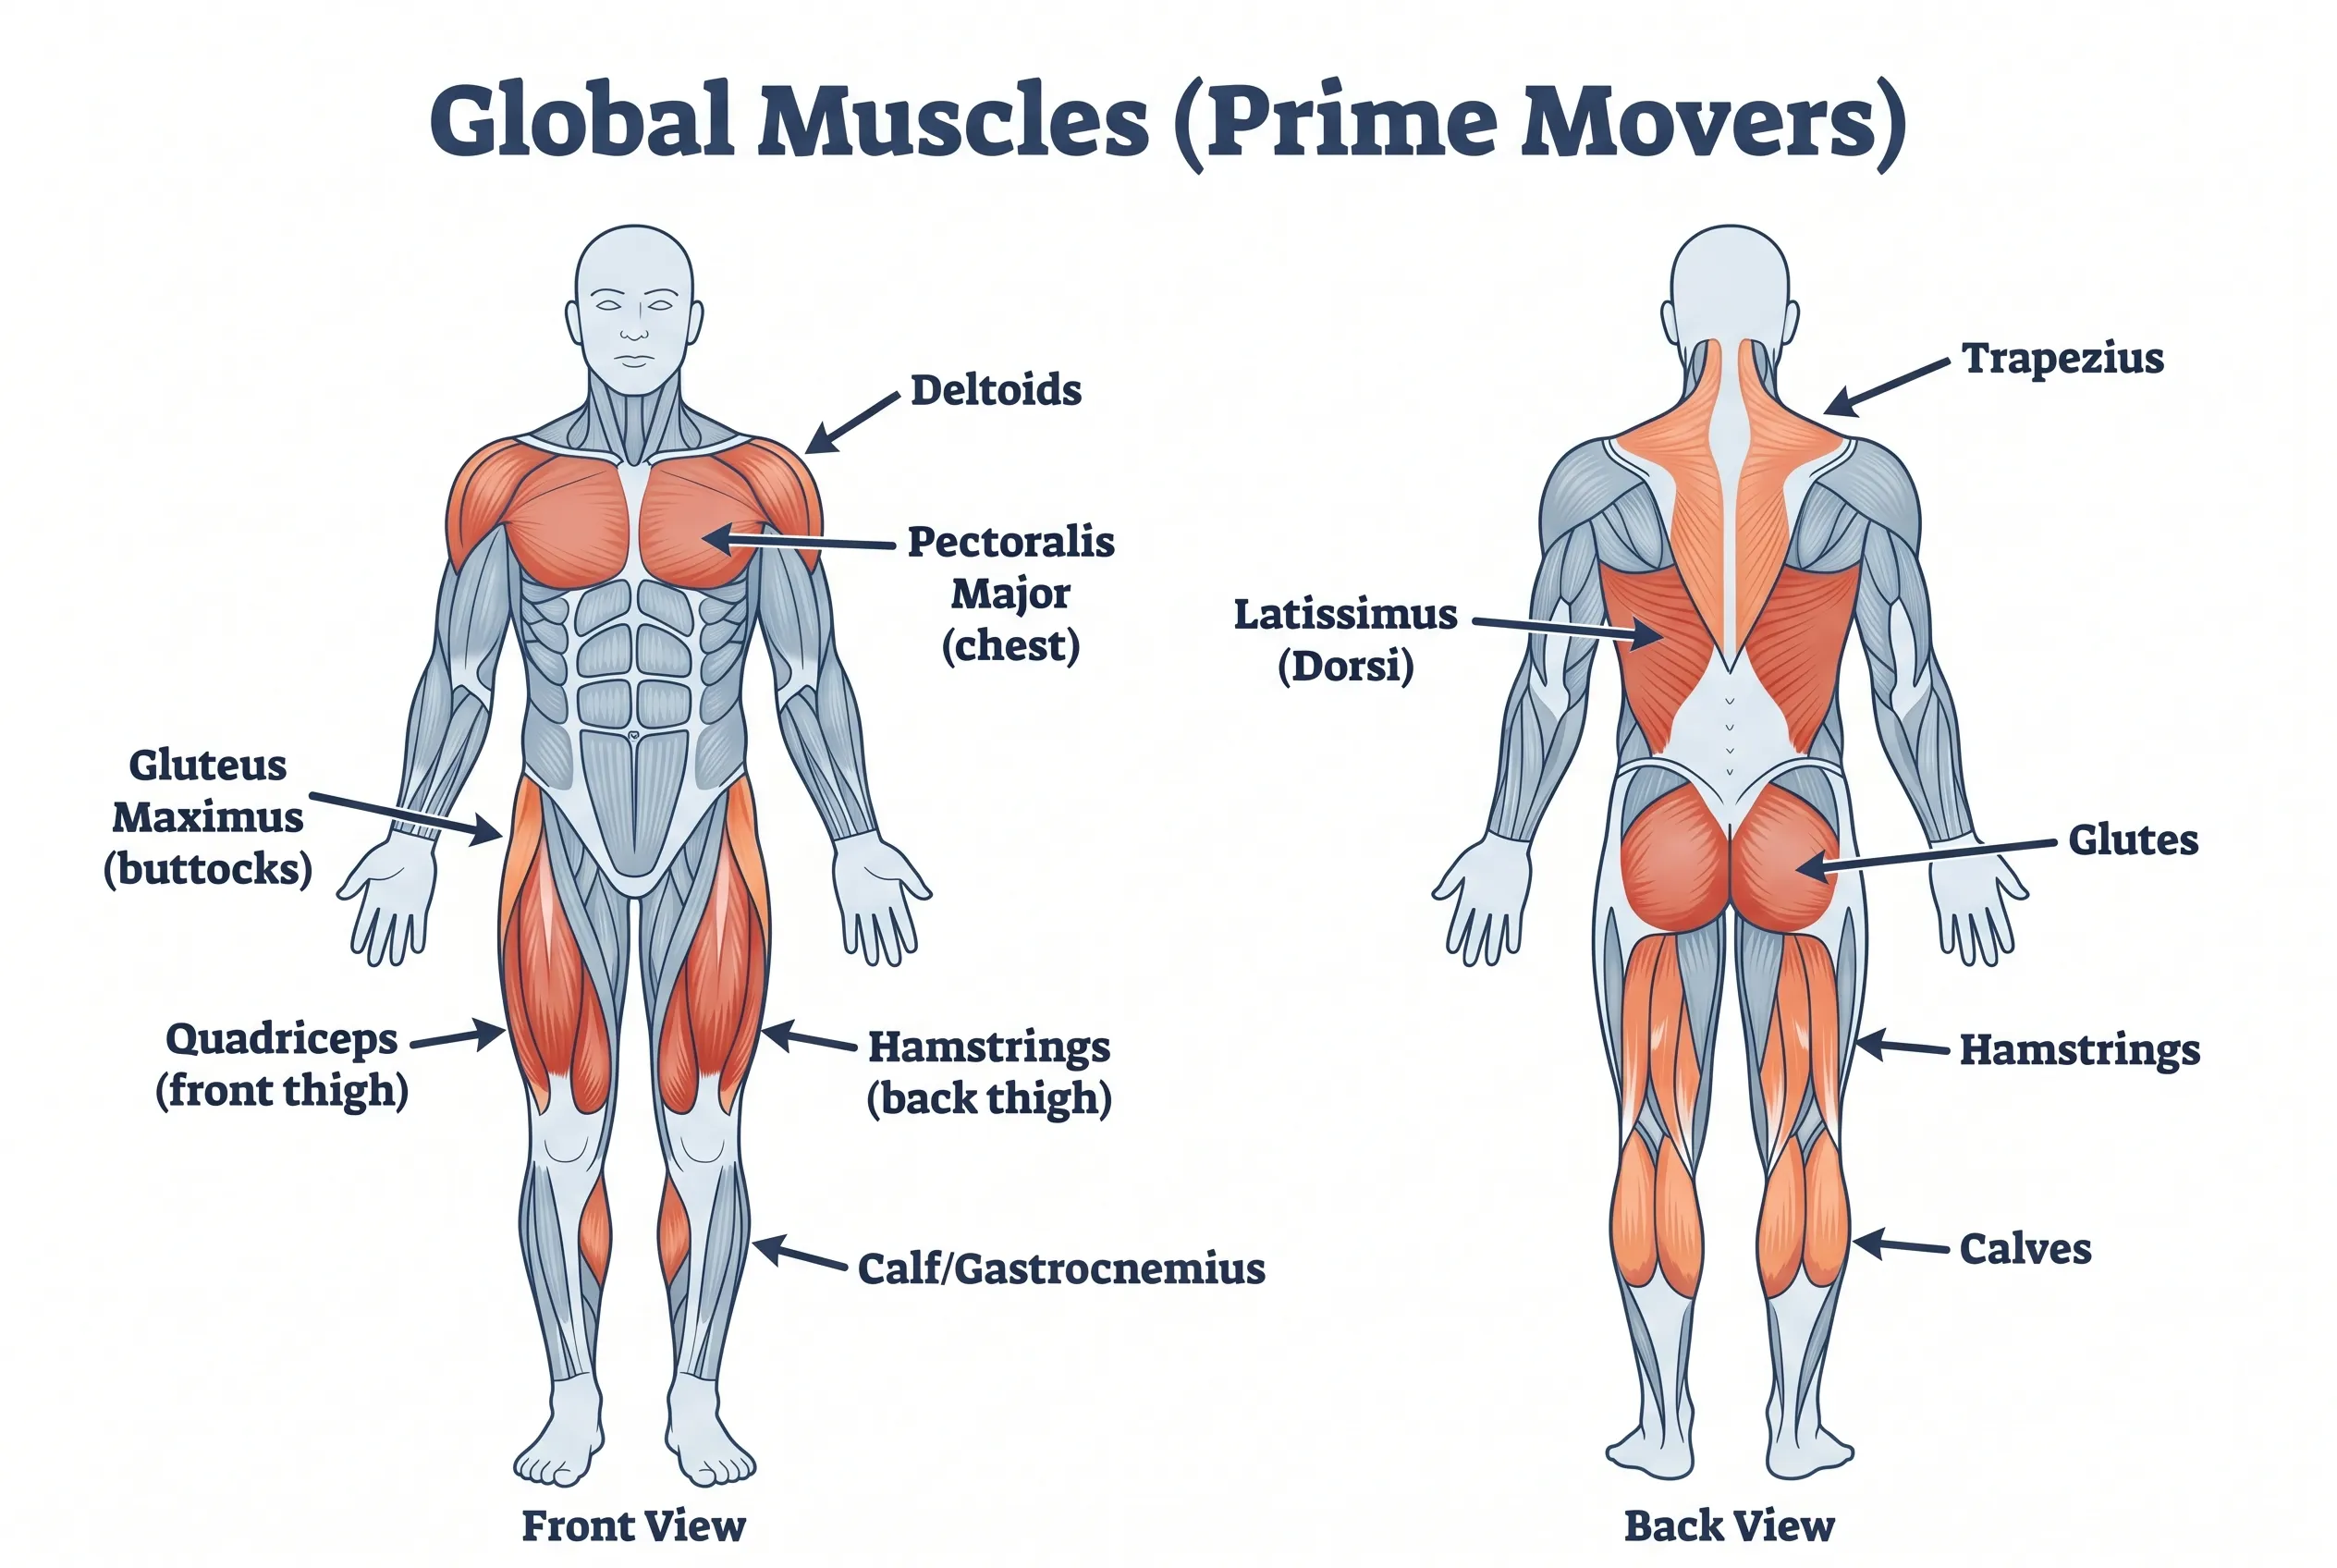
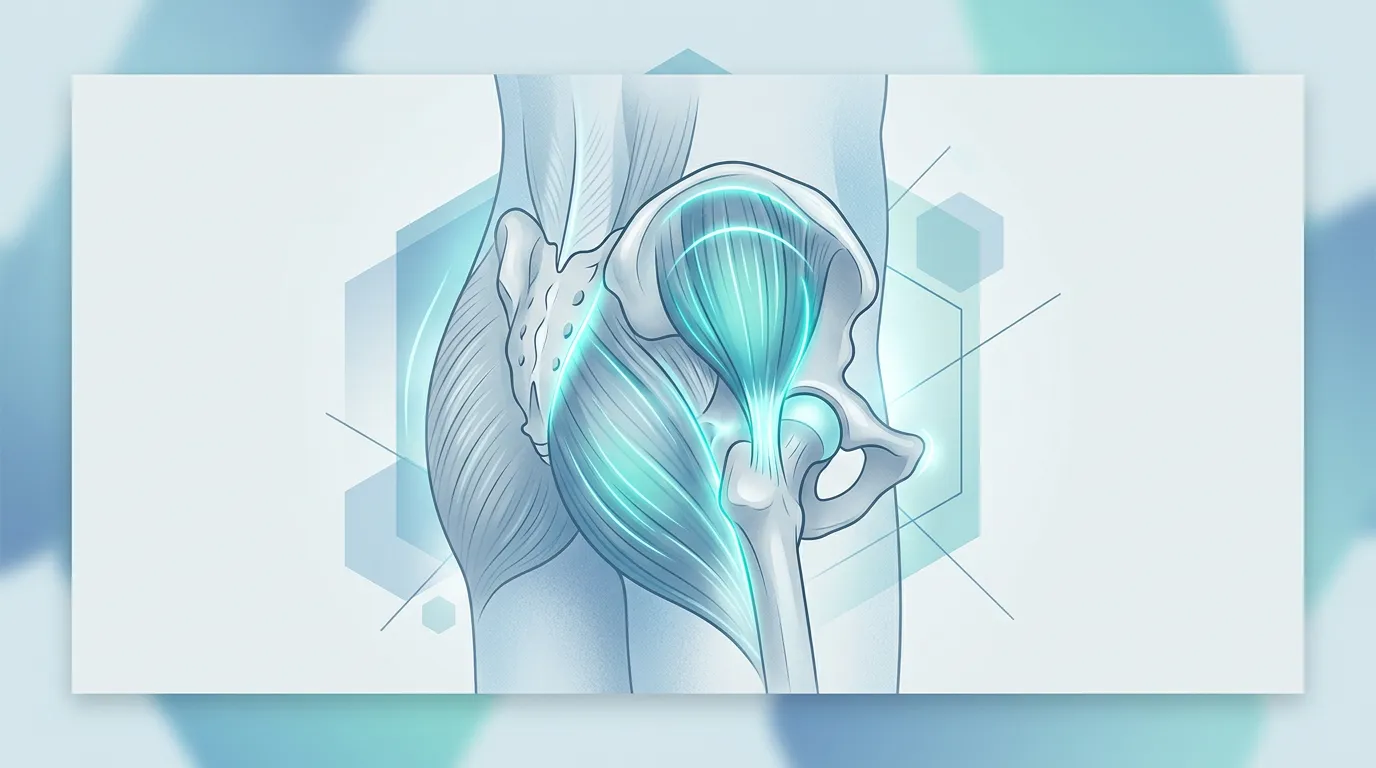
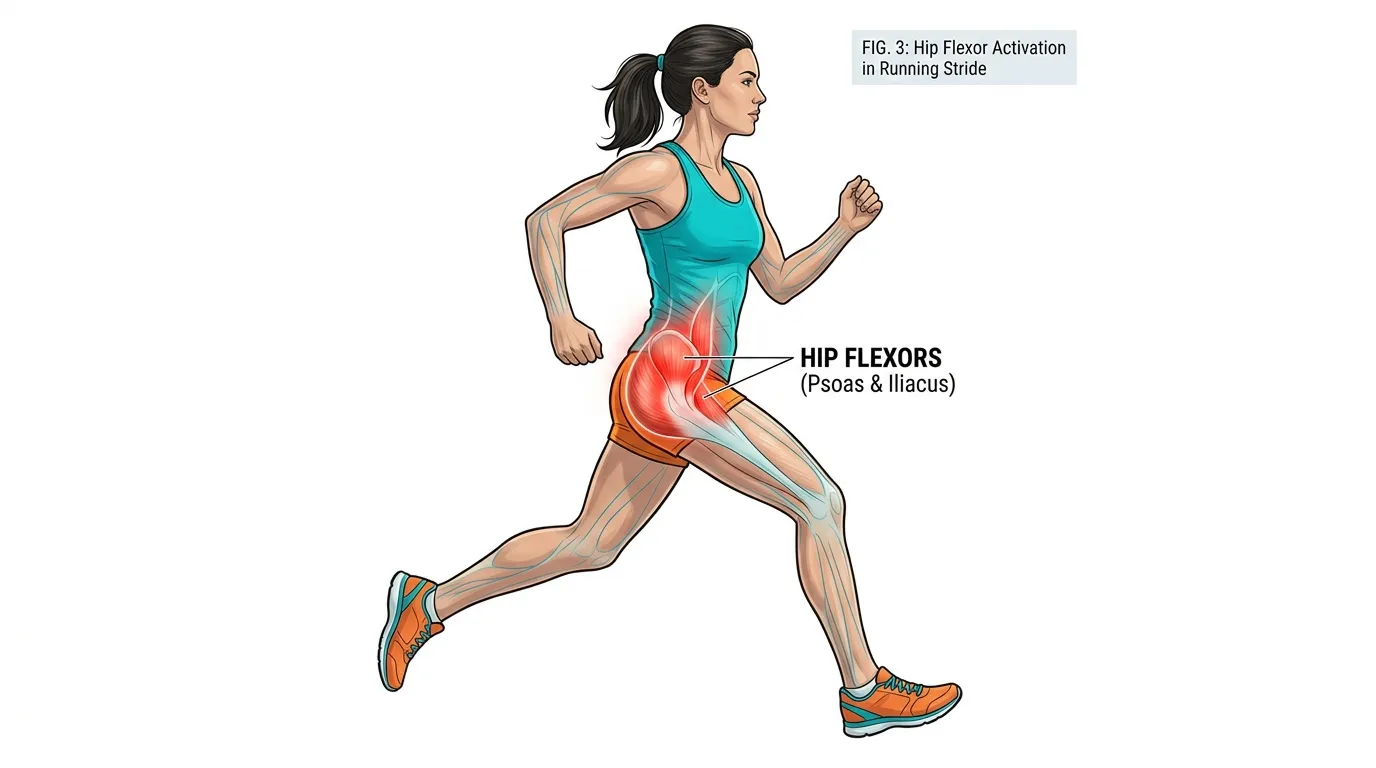
Your hip flexors are a group of muscles at the front of your hips that lift your knee toward your chest. Every running stride uses them. Yet most runners stretch their hamstrings religiously while their hip flexors tighten into rocks, quietly sabotaging performance and inviting injury.
Why hip flexors matter for runners
When your hip flexors are tight, they pull your pelvis into an anterior tilt — imagine spilling water out of the front of a bucket. This creates a cascade of problems:
- Your lower back arches excessively, causing compression and pain (see core stability vs postural control)
- Your glutes get stretched and inhibited, unable to fire properly (hello, dead butt syndrome)
- Your stride length shortens because tight hips can’t extend fully
- Your hamstrings work overtime trying to pull your leg back
- Your knee tracking suffers, contributing to runner’s knee and IT band syndrome
Tight hip flexors don’t hurt in the way a calf cramp does. Instead, they show up as that nagging lower back ache after hills, the stiff feeling when you stand up from your desk, or the sense that your stride just isn’t opening up the way it used to.
The sitting problem
Here’s the modern curse: we sit. A lot. And sitting puts your hip flexors in a shortened position for hours. Your brain learns this as “normal.” When you stand up, those muscles resist lengthening. They adaptively shorten.
Runners often think they’re exempt because they exercise. But 30–60 minutes of running doesn’t undo 8–10 hours of sitting. Your hips don’t care about your weekly mileage if the rest of your day is chair-bound.
The result? You start runs feeling stiff. Your first kilometre feels like your hips are stuck in second gear. You might unconsciously shorten your stride to avoid the discomfort of full hip extension.
The signs your hip flexors are tight
Not sure if this applies to you? Try this quick scan:
- Standing test: Stand with feet together and notice if the curve in your lower back is excessive (hands should slide easily behind your back)
- Thomas test: Lie on your back at the edge of a bed, hug one knee to your chest. Does the other thigh lift off the bed? If yes, tight hip flexors
- Walking test: When you walk, do your feet feel like they land too far in front of you rather than under your hips?
- Running test: Do you feel restricted at the back of your stride, like you can’t let your leg trail fully behind you?
Releasing your hip flexors: the stretch routine
The fix isn’t complicated, but it requires consistency. Here are the most effective hip flexor releases for runners.
Kneeling Hip Flexor Stretch — The Foundation
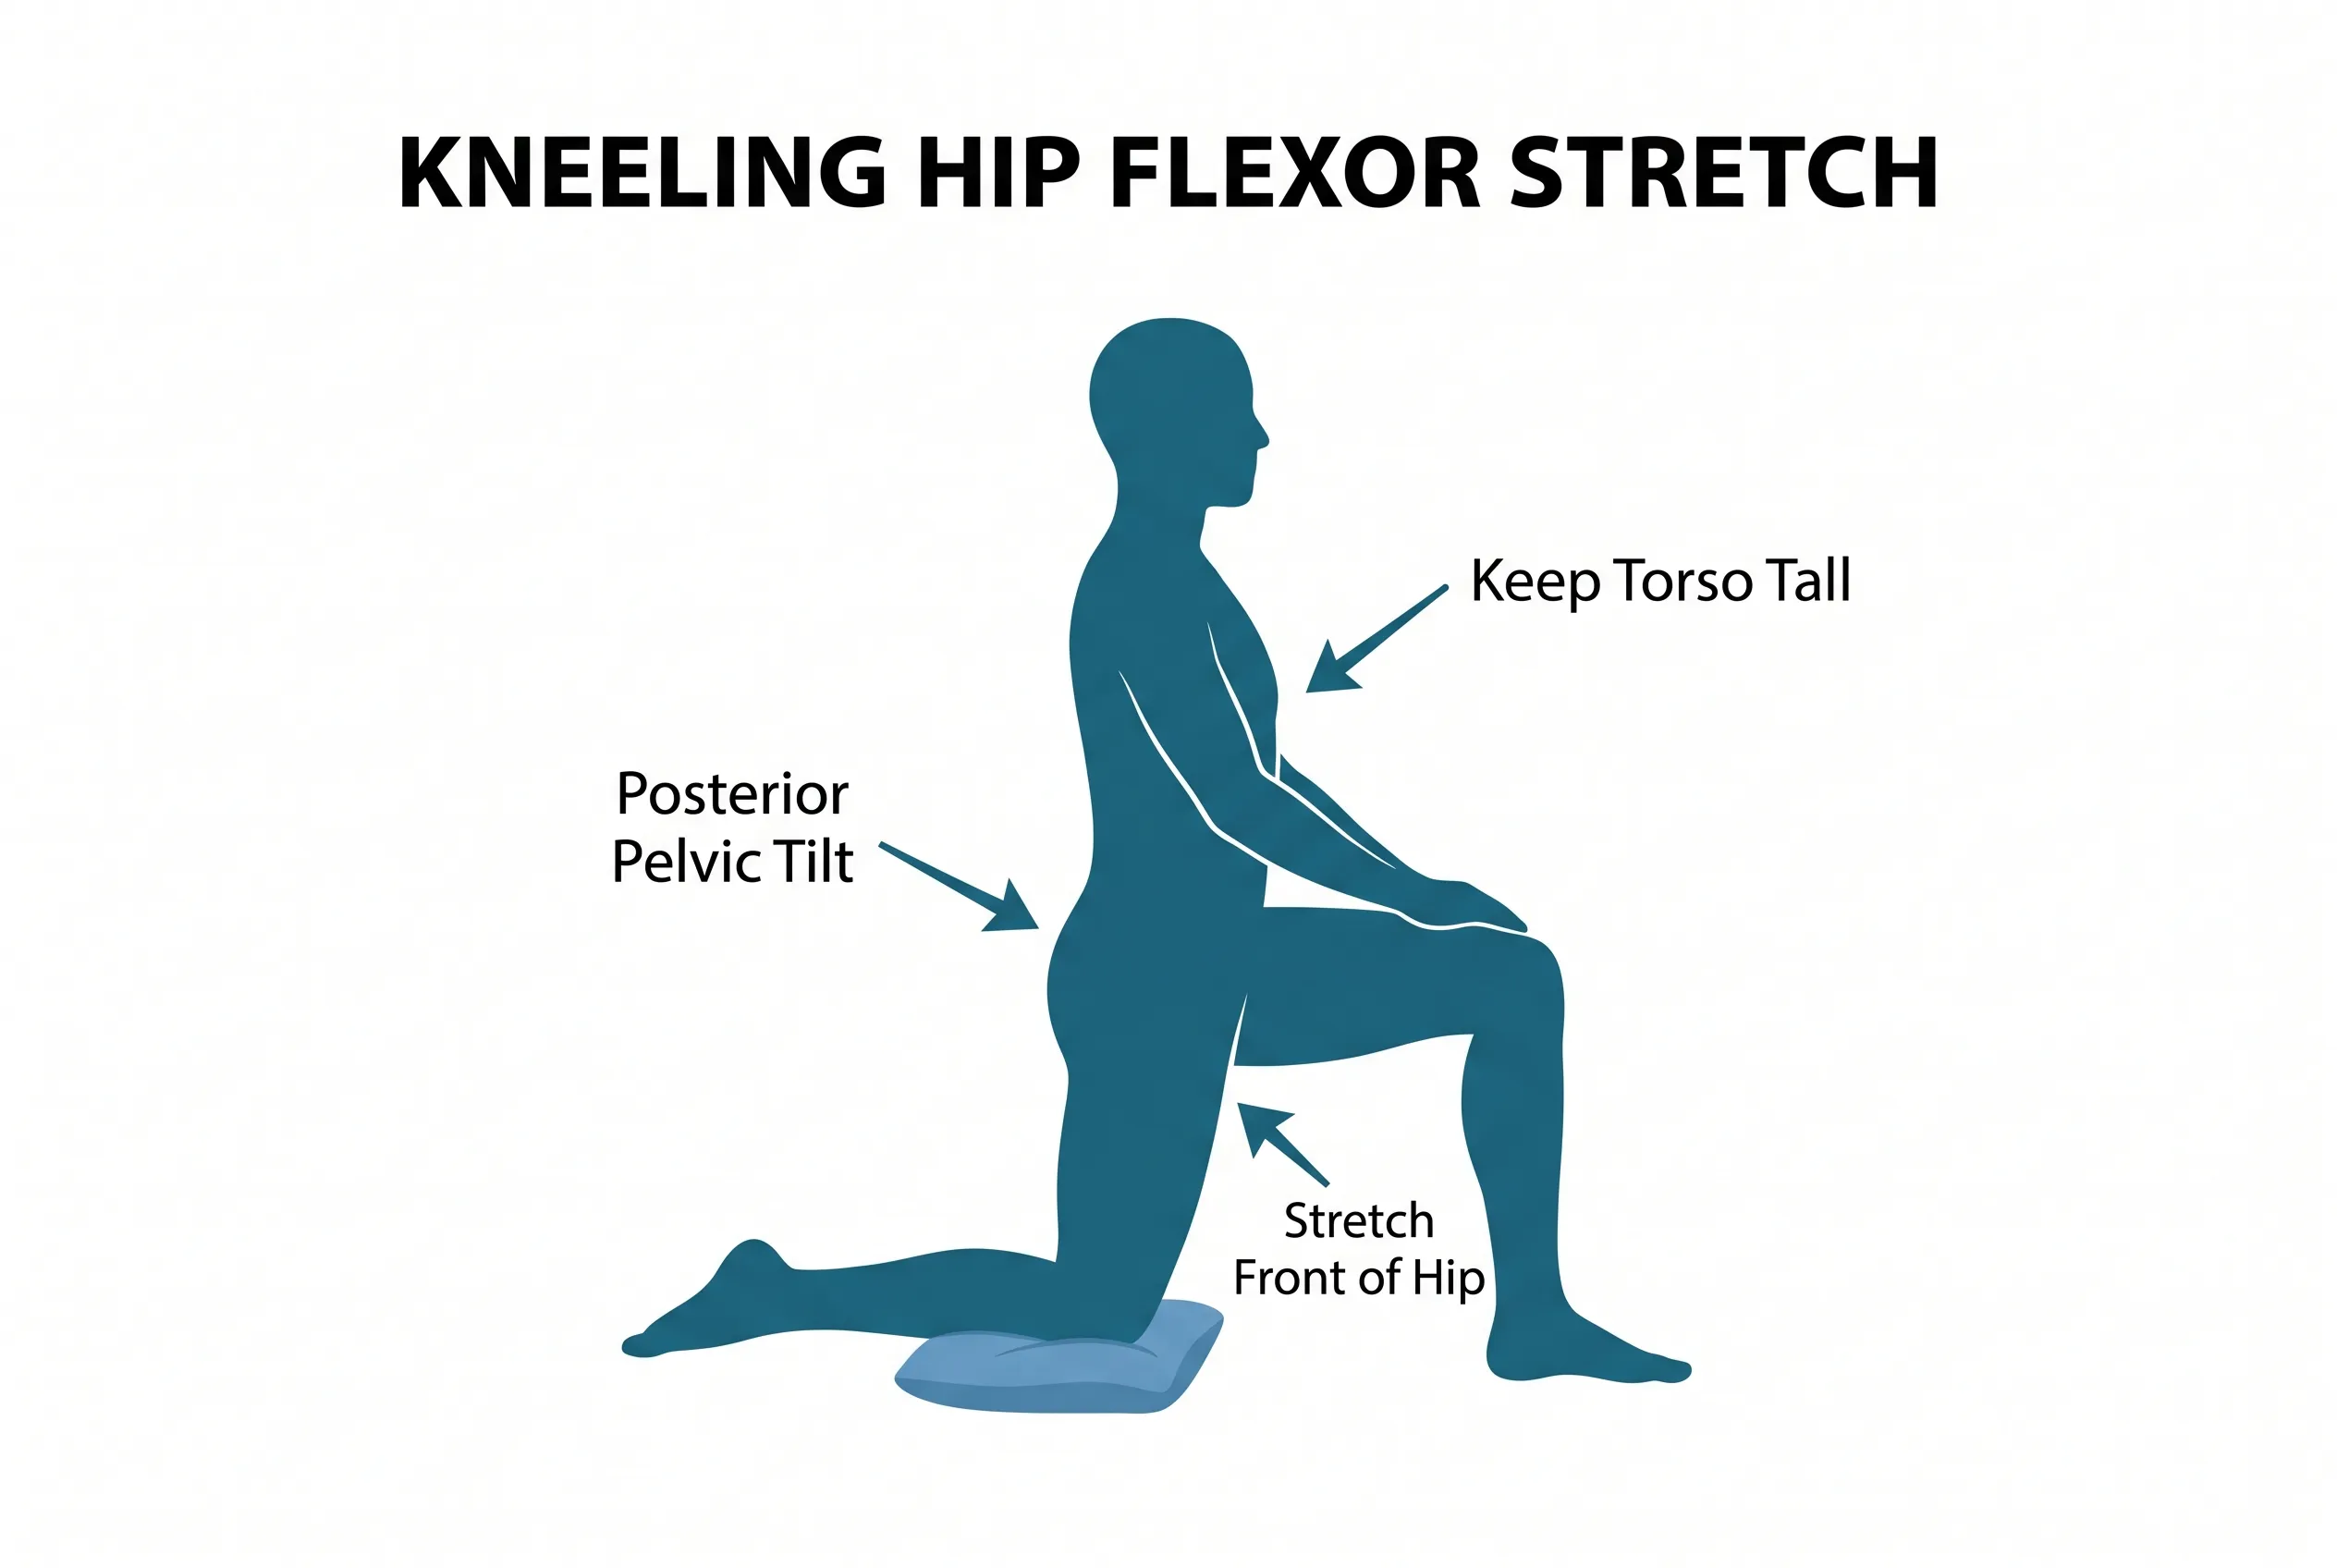
Targets: Psoas major, iliacus, rectus femoris
This is your bread and butter stretch. Done right, it targets the deep hip flexor muscles that connect your spine to your leg.
Step-by-step instructions:
- Start in a half-kneeling position on a comfortable surface (use a cushion under your back knee if needed)
- Place your right foot flat on the ground in front of you, knee bent at 90 degrees
- Keep your left knee on the ground behind you
- Critical step: Tuck your tailbone slightly by drawing your pubic bone toward your belly button (posterior pelvic tilt) — this flattens your lower back
- Place both hands on your front thigh for balance
- Gently push your hips forward until you feel a stretch in the front of your left hip
- You should feel the stretch in the thigh of your back leg, not in your lower back
- Keep your torso tall and shoulders stacked over your hips
- Breathe deeply and hold
- Switch sides and repeat
Common mistakes to avoid:
- Don’t arch your lower back — this means you haven’t tucked your pelvis enough
- Don’t let your front knee travel past your toes — keep shin vertical
- Don’t lean forward — stay upright through your torso
Hold for: 45–60 seconds per side
Frequency: Daily, especially after running and sitting
Progression: Raise the arm on the same side as your back leg, reaching up and slightly back to deepen the stretch
Couch Stretch — The Deep Release
Targets: Rectus femoris, psoas major, iliacus (deeper quadriceps and hip flexors)
Named for the fact that you can do it against the back of a couch, this stretch takes the kneeling position deeper. It adds a quadriceps component that the basic hip flexor stretch misses.
Step-by-step instructions:
- Place a cushion or yoga mat on the floor near a wall or couch
- Kneel facing away from the wall with your back knee on the cushion
- Bring your back knee right up against the wall, tucking it into the corner where the wall meets the floor
- Position the top of your back foot against the wall (shoe lace side facing the wall)
- Step your front foot forward into a lunge position, knee bent at 90 degrees
- Your front knee should be positioned directly over your front ankle
- Critical step: Tuck your tailbone and engage your core to keep your pelvis neutral
- Keep your torso vertical — imagine a string pulling the crown of your head toward the ceiling
- Gently push your hips toward the wall until you feel a deep stretch in the thigh of your back leg
- If you’re doing it right, the intensity tells you you’re in the right place
- Switch sides and repeat
Common mistakes to avoid:
- Don’t let your lower back arch — keep your core engaged
- Don’t lean forward — the stretch happens through hip extension, not leaning
- Don’t let your front knee cave inward — keep it tracking over your middle toes
Hold for: 60–90 seconds per side
Frequency: 3–4 times per week, or when feeling particularly tight
Progression: Once comfortable and able to maintain upright posture, raise both arms overhead and reach slightly backward
90/90 Hip Switch — Mobility, Not Just Stretching
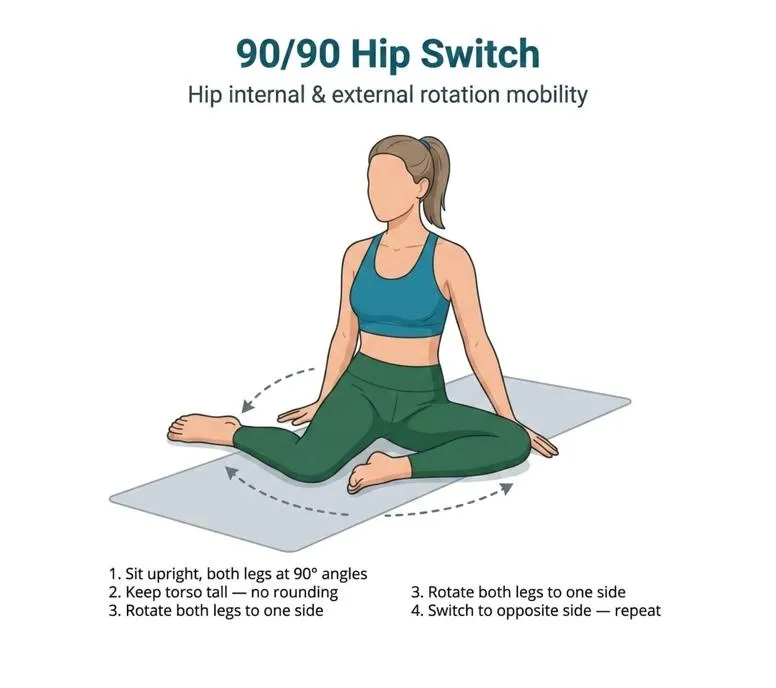
Targets: Hip rotators, gluteus medius, tensor fasciae latae (TFL), hip capsule
Tightness isn’t just about length — it’s about how your hip moves. This dynamic stretch improves rotation and internal/external hip mobility, teaching your hip to move through its full range under control.
Step-by-step instructions:
- Sit on the floor with your legs extended in front of you
- Bend your right knee and place your right foot on the floor in front of your left hip, knee at 90 degrees
- Bend your left knee and place your left leg behind you, also at 90 degrees, with your left foot pointing backward
- Both knees should form 90-degree angles — one in front, one behind
- Sit tall with your spine extended, hands resting on the floor beside your hips for balance if needed
- The movement: Keeping both legs at 90 degrees, rotate your hips and pelvis to switch legs
- Bring your left leg forward and your right leg back, both still maintaining 90-degree angles
- Your knees are the pivot point — imagine your pelvis rotating around an axis
- Move slowly and deliberately with full control — no momentum
- Continue alternating sides smoothly
Common mistakes to avoid:
- Don’t rush — this isn’t a speed exercise
- Don’t let your knees collapse inward — keep them at true 90 degrees
- Don’t round your back — stay tall through your spine
- Don’t let your trailing foot slide out of position
Do: 10 switches per side (20 total rotations)
Frequency: Before running as part of warm-up, or daily for maintenance
Progression: Add a forward fold over each front leg before switching — fold forward, breathe, sit tall, then switch
Pigeon Pose (Upright Variation) — The Glute/Hip Flexor Combo

Targets: Gluteus maximus, piriformis, deep hip rotators (front leg); hip flexors (back leg)
Borrowed from yoga but backed by physios, this upright variation targets both the hip flexors of the back leg and the deep glutes of the front leg. It’s efficient and effective for runners who need to open tight hips.
Step-by-step instructions:
- Start in a high plank or push-up position on your hands and toes
- Bring your right knee forward toward your right wrist
- Angle your right shin diagonally across your body toward your left hip/wrist area
- The more your shin is perpendicular to your body, the gentler the stretch; the more parallel, the deeper
- Extend your left leg straight behind you on the floor
- Keep the top of your back foot resting on the floor, toes pointing backward
- Square your hips: Gently draw your right hip back and left hip forward so both hip bones face the floor equally
- Place your hands on the floor beside your hips and lift your chest tall
- Keep your spine extended and shoulders relaxed away from your ears
- Gently press your hips toward the floor to deepen the stretch in your right glute
- Switch sides and repeat
Common mistakes to avoid:
- Don’t let your hips roll to one side — keep them square and facing forward
- Don’t collapse through your lower back — stay lifted through your spine
- Don’t force the front knee beyond your comfort level — listen to your hip
Hold for: 60–90 seconds per side
Frequency: After running or as part of evening routine
Progression: As flexibility allows, fold forward over your front leg into “sleeping pigeon” variation; use props (cushion, block) under your front hip if needed — better to be supported and square than collapsed and twisted
Foam Roller Release — The Self-Massage
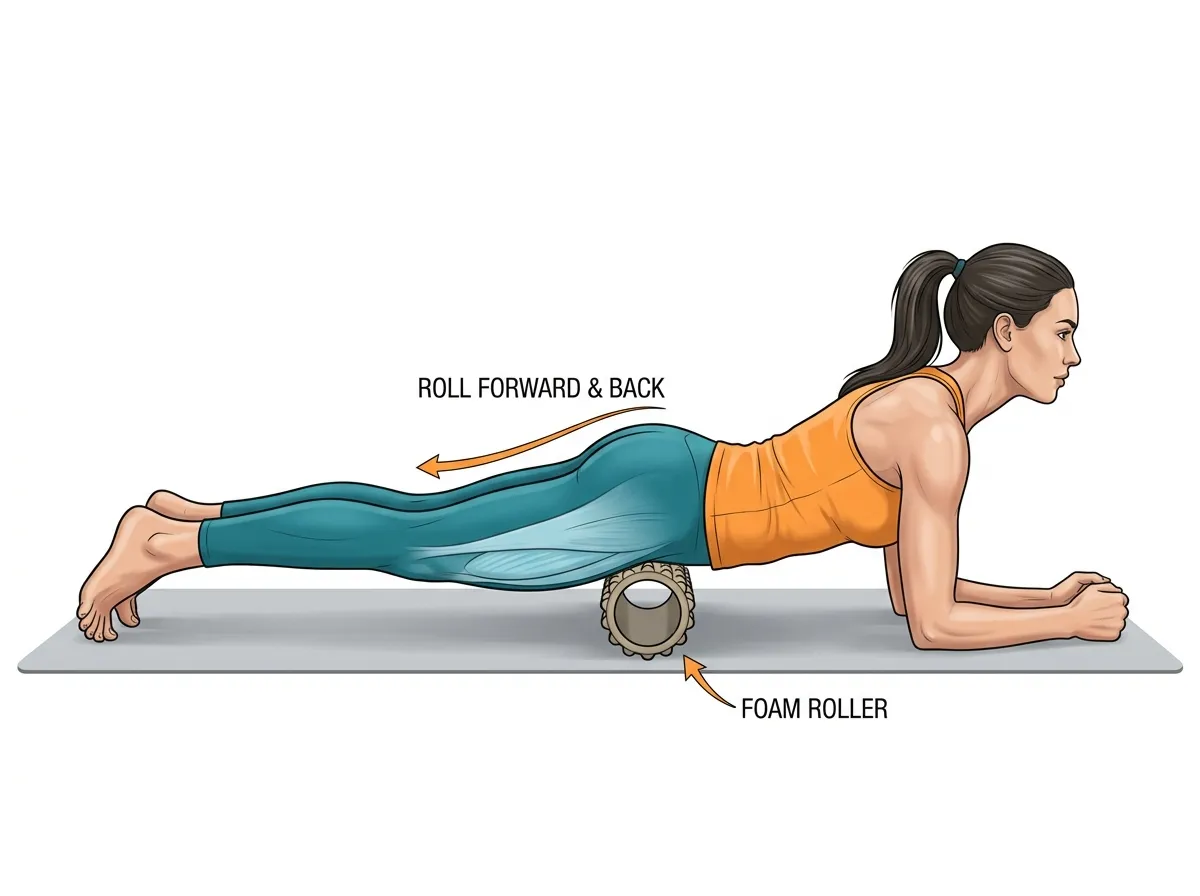
Targets: Rectus femoris, vastus lateralis, tensor fasciae latae (TFL), iliotibial band (ITB)
Sometimes stretching isn’t enough — the tissue needs direct pressure to release. This self-myofascial release technique targets the spots your foam roller usually misses.
Step-by-step instructions:
- Place a foam roller on the floor in front of you
- Get on your hands and knees with your wrists under your shoulders
- Lower down onto your forearms, elbows under shoulders, hands together or in fists
- Extend both legs straight behind you into a forearm plank position
- Position the foam roller under the front of your right hip, just below your hip bone
- Your left leg should be relaxed and extended behind you, toes resting on the floor
- The movement: Slowly roll forward and backward about 10–15 centimetres
- Pause on any tender spots (trigger points) for 20–30 seconds and breathe
- Gradually work your way down toward your mid-thigh over 2 minutes
- Focus on the area just below your hip bone and slightly to the outside — this targets the iliacus and tensor fasciae latae (TFL), often neglected but commonly tight in runners
- Switch sides and repeat
Common mistakes to avoid:
- Don’t roll directly over the hip bone itself — stay on the soft tissue just below it
- Don’t rush — spend time on tender spots
- Don’t hold your breath — breathe into the pressure
- Don’t go so deep that you feel sharp pain — discomfort is okay, sharp pain is not
Roll for: 2 minutes per side
Frequency: Post-run or daily if chronically tight
Progression: Move to a harder ball (lacrosse ball) for deeper, more targeted pressure
Strengthening: the other half of the equation
Stretching tight hip flexors is only half the battle. You also need to strengthen the muscles that oppose them — your glutes and hamstrings — to hold your pelvis in a neutral position.
From the dead butt syndrome post: glute bridges, single-leg bridges, and hip thrusts. These lock in the gains from your stretching by teaching your body to maintain that open hip position under load.
Strength + flexibility = mobility that lasts.
The bottom line
Your hip flexors are the silent thieves of running performance. They shorten from sitting, tighten from running, and quietly pull your body out of alignment.
You don’t need to become a yoga master. Five minutes of targeted stretching daily — especially after sitting and before running — can open your stride, reduce back pain, and let your glutes do their job.
Pair these stretches with glute activation exercises from dead butt syndrome and hip stability work from Pilates and Hip Stability for complete hip health.
Don’t let your hip flexors steal another kilometre. Give them the attention they deserve.