The side-of-knee pain that stops runners in their tracks
You’ve felt it — that sharp ache on the outside of your knee, usually striking mid-run when fatigue sets in. It might start as an annoyance, but push through it and it becomes unbearable. Welcome to IT band syndrome, the bane of runners everywhere.
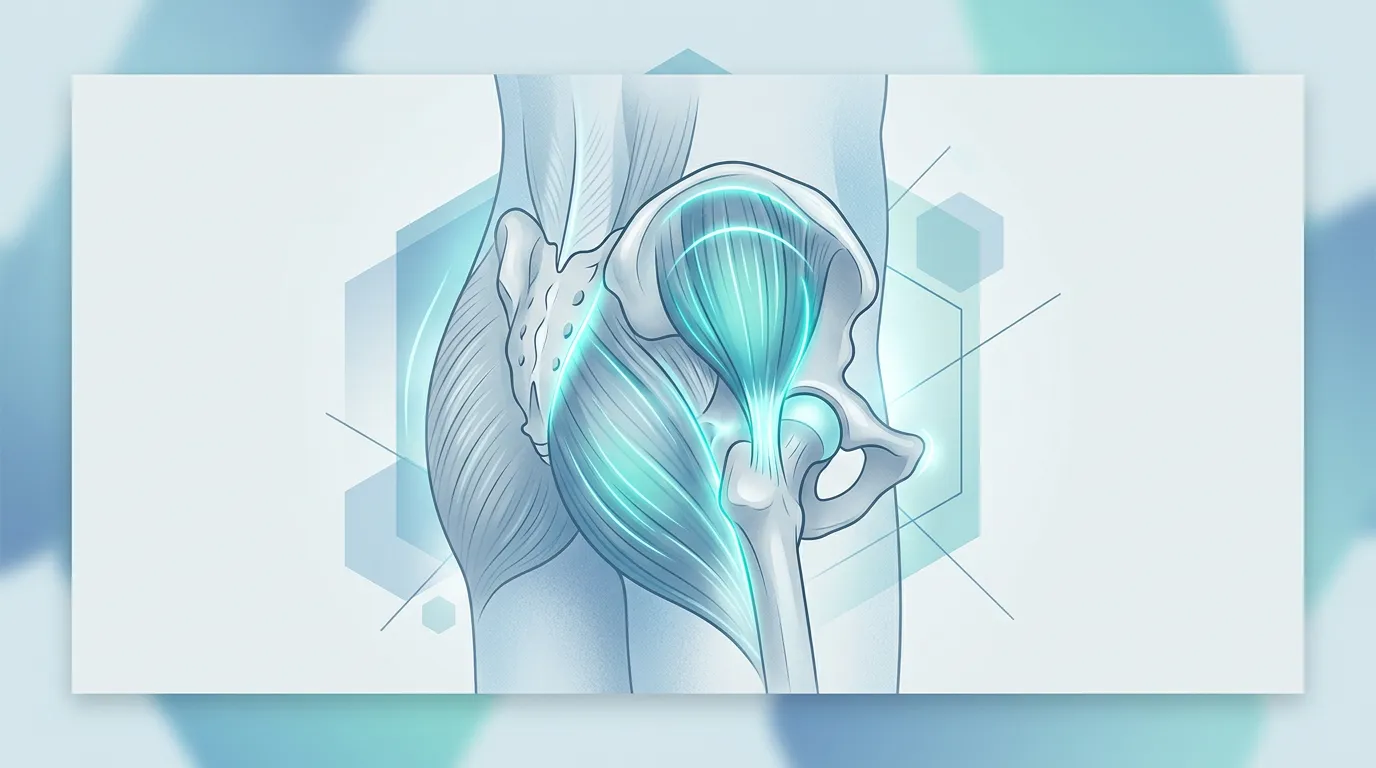
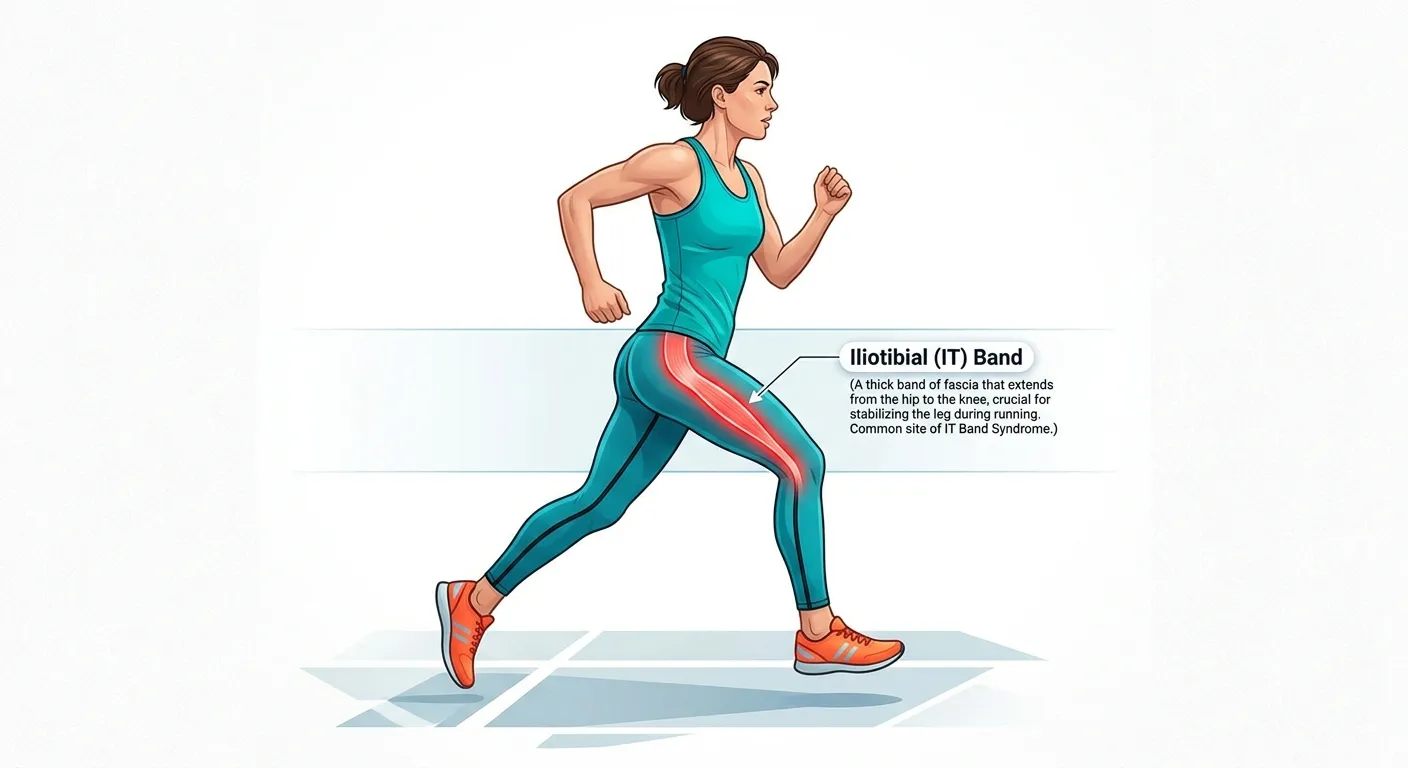
The iliotibial band (IT band) is a thick strip of fascia running from your hip to your knee along the outside of your thigh. It’s not a muscle — it can’t be stretched like one. When it gets irritated, usually from rubbing against the bony bump on the outside of your knee, the pain is unmistakable.
Here’s the part most runners miss: IT band syndrome is rarely a knee problem. It’s almost always a hip and glute problem showing up at your knee.
Why your IT band screams
When your gluteus medius and hip abductors are weak, your thigh bone rotates inward with each step. This tightens the IT band and causes it to rub against the lateral femoral condyle — that bony knob on the outside of your knee. Rubbing creates friction. Friction creates inflammation. Inflammation creates pain.
The usual recipe for disaster:
- Weak glutes (hello, dead butt syndrome)
- Tight hip flexors (see hip flexors are stealing your stride)
- Running on cambered roads (always the same side sloping)
- Increasing mileage or hills too quickly
- Worn shoes that alter your biomechanics
Notice what’s missing from that list? Actual IT band tightness. Blaming a tight IT band is like blaming the victim. The band is tight because something above it isn’t doing its job.
The warning signs
IT band pain has a specific signature:
- Pain on the outside of the knee, not the front or inside
- Pain that starts 10–15 minutes into a run and worsens until you stop
- Pain going down stairs (worse than going up)
- Pain when you press on that bony spot on the outside of your knee
- No swelling, but definite tenderness
If your pain is on the front of the knee beneath the kneecap, that’s runner’s knee — different problem. If it’s on the inside, that’s medial knee pain — different again. IT band pain is distinctly lateral (outside).
Fixing IT band syndrome: strength and control
Stretching your IT band won’t help. It’s fascia, not muscle, and research shows it barely stretches at all. The fix is strengthening the muscles that control your hip and thigh — namely your gluteus medius and hip abductors — so your IT band stops getting yanked tight with every stride.
Here are the three most effective exercises for IT band syndrome recovery and prevention.
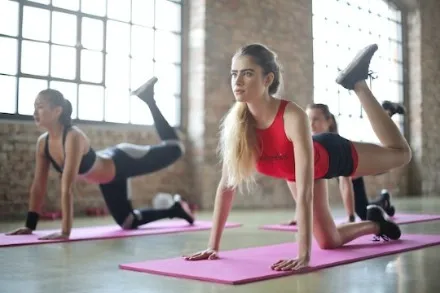
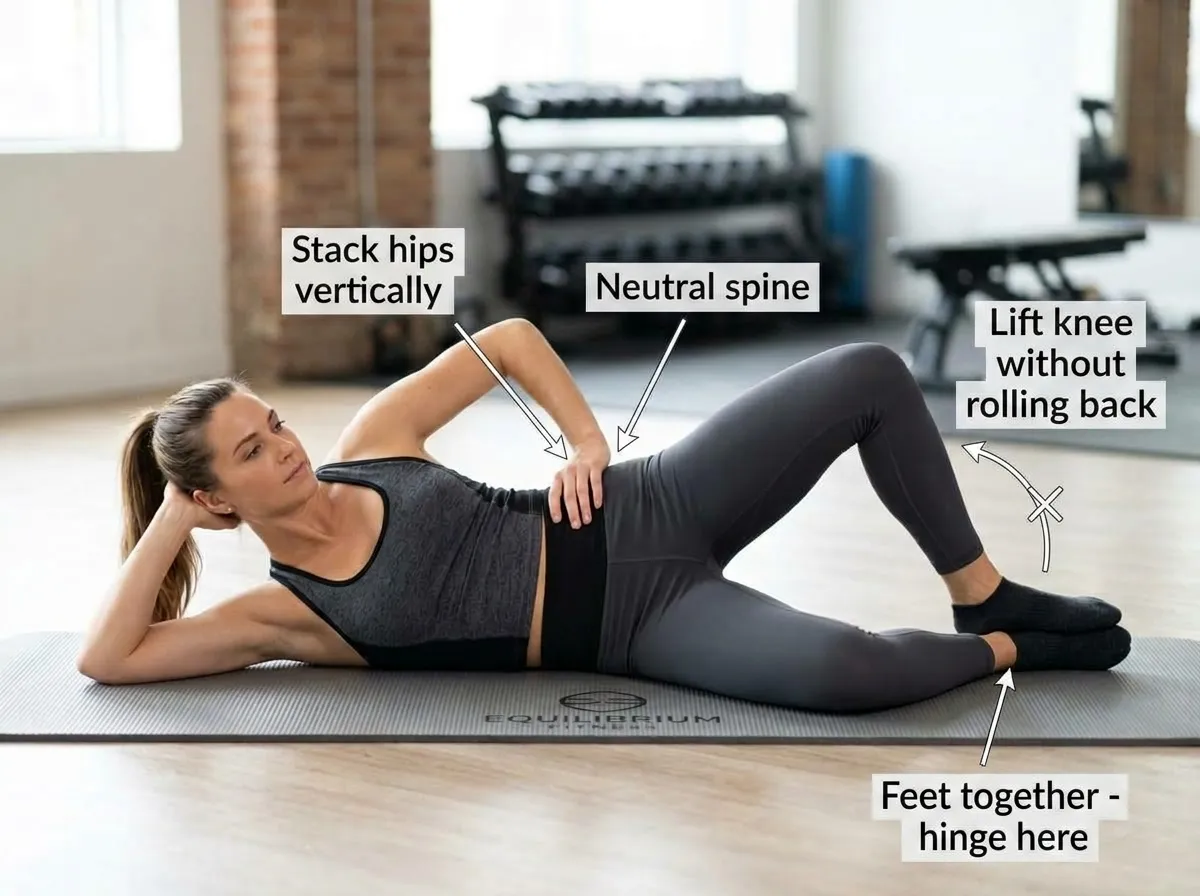
Clam Shell — Gluteus Medius Activation
Targets: Gluteus medius, gluteus minimus, deep hip rotators
The clam is your foundational move. It looks simple, but done correctly, it fires up the muscles that should be stabilising your pelvis with every step.
Step-by-step instructions:
- Lie on your side on a comfortable mat or carpet
- Bend your knees to approximately 45 degrees, stacking them on top of each other
- Keep your feet together — they act as a hinge throughout the movement
- Rest your head on your bottom arm or prop your head up with your hand
- Place your top hand on your top hip to feel the muscle working — this is your feedback
- The movement: Keeping your feet touching, slowly lift your top knee upward like a clamshell opening
- Lift as high as you can WITHOUT letting your hips roll backward — this is the critical cue
- Your pelvis should stay perfectly still; only your knee moves
- Hold for 2–3 seconds at the top, squeezing your side glute hard
- Lower slowly with control, resisting gravity on the way down
Common mistakes to avoid:
- Don’t let your top hip roll back — if it does, you’ve lost the target muscle
- Don’t rush — slow movement is harder and more effective
- Don’t let your feet separate — they must stay touching
- Don’t hold your breath — exhale as you lift, inhale as you lower
Do: 3 sets of 15 repetitions per side
Frequency: Daily during recovery; 3–4 times per week for prevention
Progression: Add a resistance band just above your knees — this increases the challenge significantly and better mimics running demands
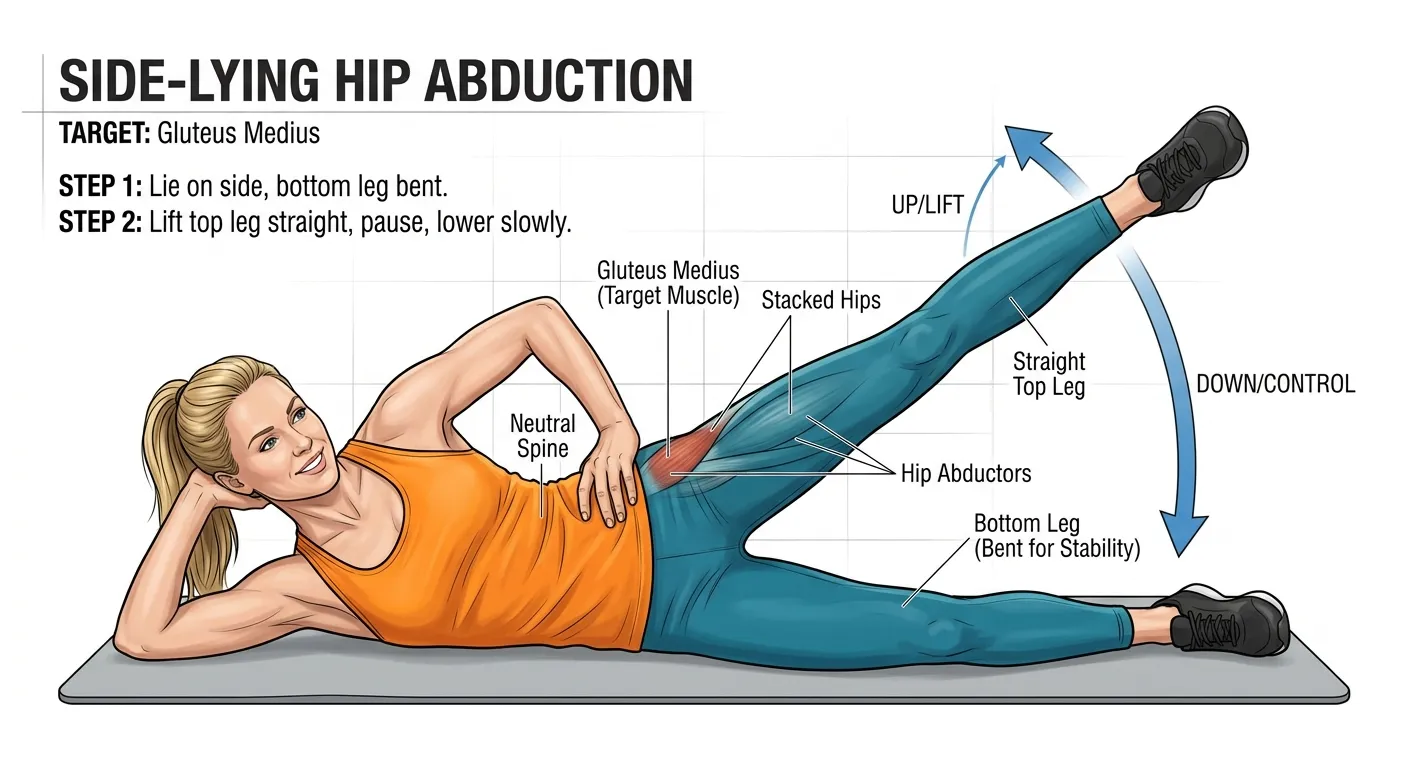
Side-Lying Hip Abduction — Building Strength
Targets: Gluteus medius, tensor fasciae latae (TFL), hip abductors
Once you’ve activated your glutes with clams, it’s time to load them up. This exercise builds the strength that keeps your knee tracking properly when you run.
Step-by-step instructions:
- Lie on your side on a comfortable surface, body in a straight line from head to toe
- Stack your hips directly on top of each other — don’t let your top hip roll forward or back
- Keep your bottom leg bent at 90 degrees for stability
- Extend your top leg straight out in line with your body, toes pointing slightly downward toward the floor
- Rest your head on your bottom arm
- Place your top hand on the floor in front of your chest for light balance support, or rest it on your top hip
- The movement: Keeping your body perfectly still and your leg straight, lift your top leg straight up toward the ceiling
- Lift to approximately 30–45 degrees — no higher, or your hips will cheat by rolling
- Your top hip bone should stay pointing directly forward, not rolling back with the leg
- Lower slowly with control, tapping your toe gently on the floor before the next rep
Common mistakes to avoid:
- Don’t let your leg drift forward — keep it in line with your body
- Don’t roll your top hip backward to lift higher — quality over quantity
- Don’t point your toes up toward the ceiling — keep them slightly down
- Don’t lift above 45 degrees — that’s when other muscles take over
Do: 3 sets of 12–15 repetitions per side
Frequency: Daily during recovery; 3–4 times per week for maintenance
Progression: Add a light ankle weight (1–2 kilograms) or resistance band around your ankles once bodyweight becomes too easy
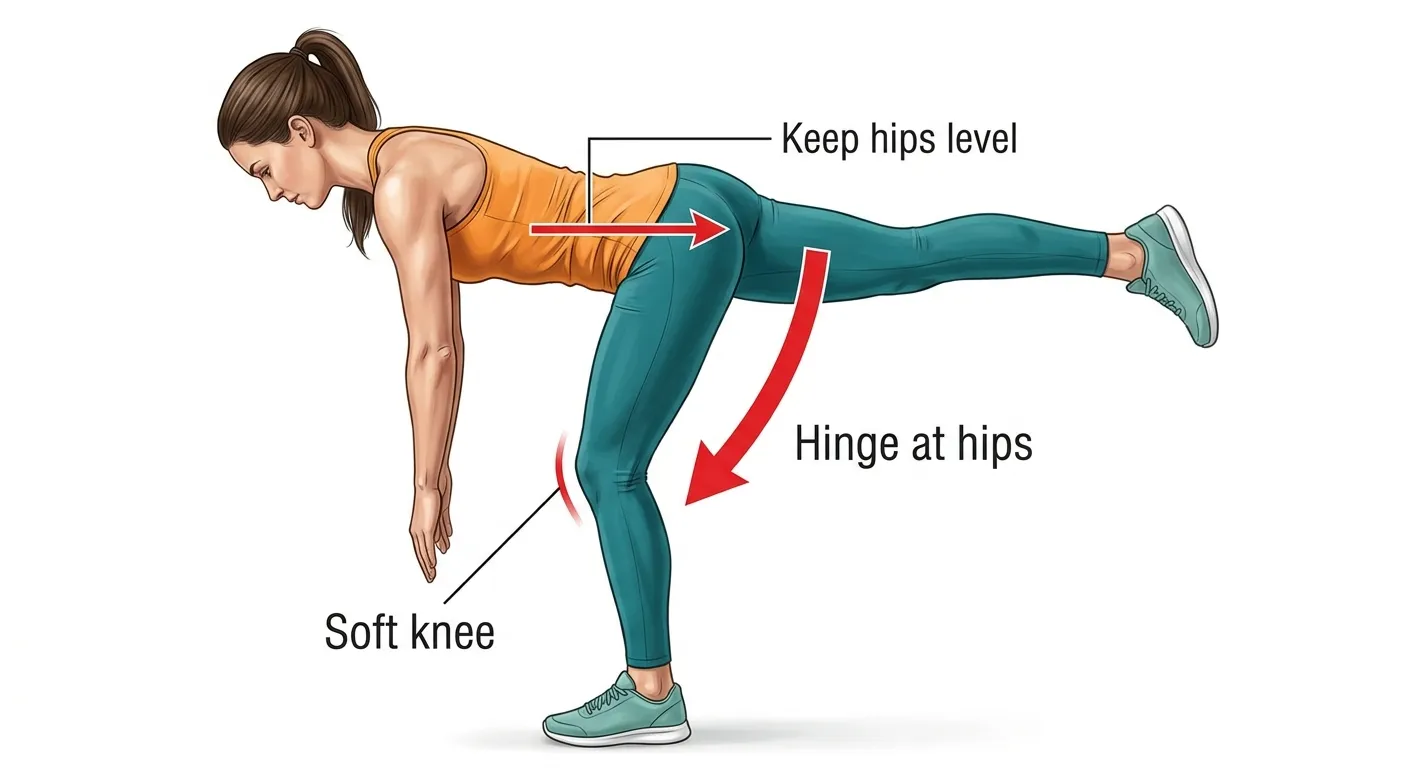
Single-Leg Romanian Deadlift — Functional Control
Targets: Gluteus maximus, gluteus medius, hamstrings, core stability
This is the bridge between rehab exercises and running. It teaches your hips to stabilise your entire leg while your body moves — exactly what happens when you run.
Step-by-step instructions:
- Stand tall with your feet hip-width apart, holding a light dumbbell or kettlebell in your right hand (or no weight to start)
- Shift your weight onto your left foot, keeping a soft bend in your left knee — never lock it completely straight
- Lift your right foot slightly off the floor, just clearing the ground
- The movement: Hinge forward at your hips, sending your right leg straight back behind you
- Keep your spine neutral with a slight natural curve in your lower back — don’t round or arch excessively
- Lower your torso until you feel a stretch in your left hamstring, approximately parallel to the floor
- Your right leg extends behind you as a counterbalance, creating a T-shape with your body
- Your hips should stay level — imagine a glass of water balanced on your lower back that shouldn’t spill
- Return: Squeeze your left glute hard and drive your hips forward to return to standing
- Complete all reps on one side before switching
Common mistakes to avoid:
- Don’t let your hips open up toward the ceiling — keep them square to the floor
- Don’t round your back — keep your spine long and neutral throughout
- Don’t lock your standing knee — keep it softly bent
- Don’t let your standing foot turn out — keep it pointing forward
Do: 3 sets of 8–10 repetitions per side
Frequency: 3–4 times per week (this is a strength exercise, not daily)
Progression: Increase weight gradually, or add a balance challenge by standing on a cushion or BOSU ball
The bottom line
IT band syndrome isn’t a life sentence, but ignoring it is. The pain will only worsen until you address the root cause — weak hip stabilisers that let your thigh rotate and yank that band tight.
The exercises above aren’t magic. They work because they rebuild the strength and control your running stride demands. Do them consistently for 4–6 weeks and your knee will thank you.
For more on building hip stability through Pilates, see Pilates and Hip Stability. If you’re dealing with knee pain more broadly, Can Pilates help with Knee Pain? covers the fundamentals.
And once you’re pain-free? Don’t stop. These exercises are your insurance policy against recurrence. Ten minutes, three times per week, and you can keep running without that dreaded lateral knee pain.
Your IT band isn’t the enemy. Weak hips are. Strengthen them, and your band will stop screaming.