

The Fix Program Blog
We write about what we know:
Physiotherapy, Pilates exercise and Pregnancy Physio
25 Nov 2015 BY Katrina Tarrant POSTED IN
Women's Health
The 2015 women’s health and fitness summit
25 Nov 2015 BY Katrina Tarrant POSTED IN
Women's Health
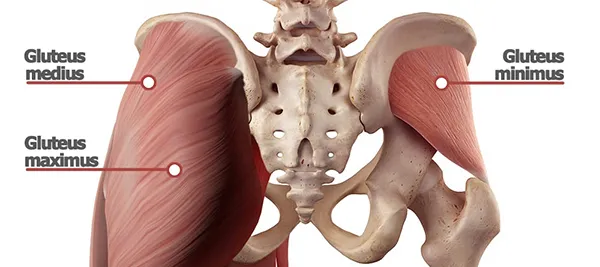
Heba wows her audience on speaking about the troubles with a tight pelvic floor This summit held September in Melbourne is an annual gathering for all those interested in women's health, fitness, and nutrition, in whatever capacity. It brings together world-renowned speakers and presenters from all...
Read More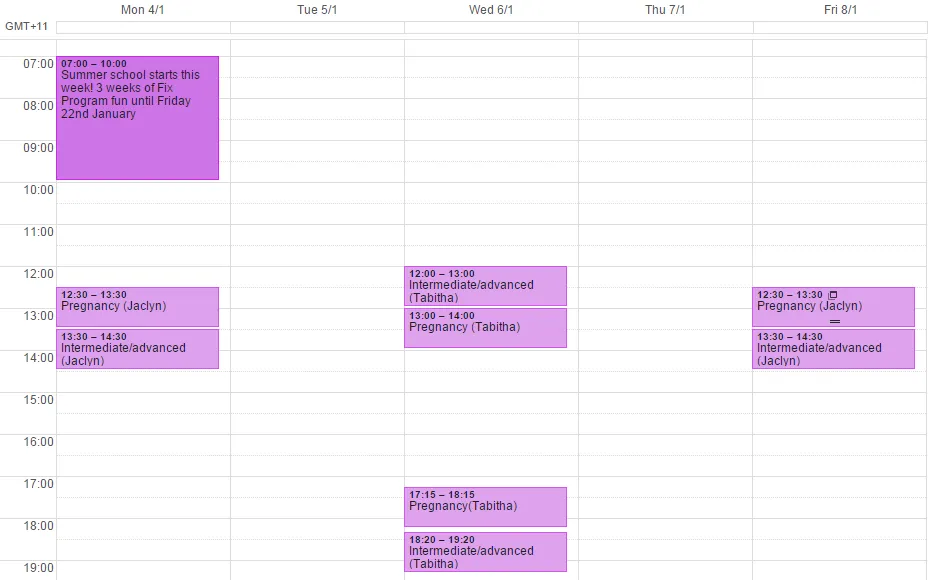
Draft Pilates Timetable Summer School 2016
Draft timetable for our summer school 2016 $1 and $1
Read More
What is normal after having a baby? Part 1
New Mums have enough on their plate looking after their new little one. Worrying about the changes in their body can sometimes become a real focus and cause for concern. Changes in the body are very normal and usually temporary. Give your body time to start to feel and look a little more like your o...
Read More
What is normal after having a baby? Part 2
Heba talks about the stuff they don't tell you about being a new mum Last month, $1. We discussed post-partum vaginal bleeding and discharge, abdominal separation, lactation and the baby blues. This month we're going to have a look at what is common after birth, but not normal. **Prolapse** Prolapse...
Read More
The do’s and dont's of using weights
Resistance and weight training Strength or resistance training has many reported benefits, but just picking up any old set of dumbbells or barbells could do you harm. Inappropriate weight, poor postures while exercising and dodgy techniques can all mean possible injury. Throwing your body around, gr...
Read More
Pregnancy and swelling
Do you feel like your legs are as thick as tree trunks? By Nicky Davies, Massage therapist form TREWellness Centre, Cremorne You may be pregnant, trying to get pregnant or had your baby. It doesn't matter which boat you're in, no doubt you've heard lots of stories about "what to expect when you're p...
Read More

The Fix Program’s Yoga ‘Sun Salutation’
Enjoy the warmth and glow after this modification of the famous yoga sequence In some of our $1, you may get a taste of the 'Salute to the Sun' or Sun Salutation. This is a common ritual and practice in all yoga styles and it has tremendous physical and mental benefits. To 'salute the sun', we are b...
Read More
Do I have stress fractures?
Shin pain explained With the running season and warmer weather just around the corner, many of us may be slipping on our trainers to get out there and exercise. Be cautious! Have you suddenly increased our walking and running intensities to risk injury? A sudden increase in the levels of our exercis...
Read More